Category: Tech Insights

  • How to Find Your WiFi Password (Fast, 2026 Guide)

    How to Find Your WiFi Password (Fast, 2026 Guide)

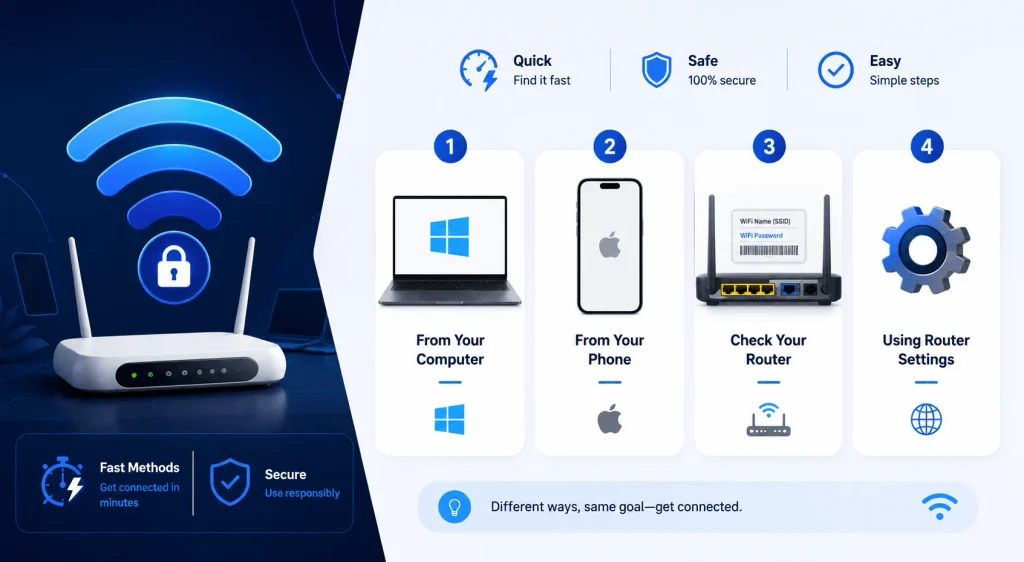
    To find your WiFi password, check your device’s saved network settings (Windows, Mac, Android, or iPhone), log into your router’s admin panel, or look for the sticker on the back of your router. Every method below works whether you’ve connected to the network before or not, and most take under a minute.

    Now let’s get into exactly how.

    Losing your WiFi password is one of those small annoyances that feels way bigger than it should. You’re standing there, phone in hand, trying to connect a new device or help a friend get online, and suddenly you realize… you have no idea what your password is.

    I get it. You’re not alone here. This happens to almost everyone at some point, and it’s genuinely not your fault — passwords get saved once, forgotten forever, and buried under years of muscle memory.

    In this guide, I’ll walk you through every single way to find your WiFi password, whether you’re on Windows, Mac, Android, iPhone, or need to dig through your router admin panel directly. No fluff. Just the steps that work.

    Quick Comparison: Which Method Is Fastest for You

    Before diving into each platform, here’s a quick snapshot so you can jump straight to what applies to you.

    MethodDevice NeededDifficultyTime Required
    Windows Network SettingsConnected PCEasyUnder 30 seconds
    Windows Command PromptAny PC (saved network)Medium1–2 minutes
    Mac Passwords AppConnected MacEasyUnder 30 seconds
    iPhone SettingsConnected iPhoneEasy10 seconds
    Android Share/QRConnected Android 10+Easy10 seconds
    Router Admin PanelAny browser + router loginMedium2–3 minutes
    Router StickerPhysical router accessVery EasyInstant
    Factory ResetPhysical router accessHard5–10 minutes

    If you’ve never connected to the network on any device, skip straight to the router admin panel or sticker methods further down.

    Why You Might Need to Find Your WiFi Password
    Before we jump into the how-to steps, let’s quickly talk about why this matters so much.

    You might need your WiFi password recovery for a bunch of reasons — setting up a smart TV, onboarding a new laptop, or just helping a guest connect without shouting the password across the room. Whatever the reason, the good news is this: your password is almost always saved somewhere on a device you already own.

    You just need to know where to look.

    • Connecting a new phone, tablet, or laptop
    • Setting up smart home devices (thermostats, cameras, speakers)
    • Helping guests get online
    • Troubleshooting a dropped connection
    • Migrating to a new router

    Now, let’s break this down device by device.

    How to Find Your WiFi Password on Windows

    Windows makes this pretty painless, actually, once you know where the setting lives.

    There are two solid ways to do this — a click-through method for people who don’t love the command line, and a faster method using Command Prompt for anyone comfortable typing a command or two.

    Method 1: Using Network Settings (No Typing Required)

    This is the easiest route if you’re already connected to the network in question.

    1. Open Network & Internet settings
    2. Click Status, then head to the Network and Sharing Center
    3. Click on your WiFi network name
    4. Select Wireless Properties
    5. Click the Security tab
    6. Check the box labeled Show characters

    And there it is. Your WiFi password appears right in front of you.

    Method 2: Using Command Prompt (Works for Any Saved Network)

    Here’s the thing — this method is genuinely more powerful because it works even for networks you’re not currently connected to, as long as your PC connected to them before.

    1. Open Command Prompt as an administrator
    2. Type netsh wlan show profiles and hit Enter
    3. Find the name of the network you need
    4. Type netsh wlan show profile name="YourNetworkName" key=clear
    5. Look for Key Content under Security settings

    That’s your password, right there in plain text.

    How to Find Your WiFi Password on a Mac

    Mac users, you’re actually in a really convenient position here, because Apple stores everything through its built-in password manager.

    On newer macOS versions, Apple moved this into the dedicated Passwords app, which makes the whole process feel a lot less technical than digging through Keychain Access.

    Step-by-Step Guide

    1. Open the Passwords app on your Mac
    2. Click WiFi in the sidebar
    3. Select the network you’re looking for
    4. Hover over the dots next to Password
    5. Click to copy or reveal it

    If you’re on an older macOS version, use Keychain Access instead:

    1. Press Cmd + Space and search “Keychain Access”
    2. Search for your network name
    3. Double-click the entry
    4. Check Show password
    5. Authenticate with your Mac’s admin credentials

    Dealing with other Mac issues while you’re at it? Check out our guide on fixing slow boot times on Mac

    Simple enough, right? According to Apple’s own support documentation, this method also works across devices using Universal Clipboard, which is handy if you’re moving a password from your Mac to your iPhone.

    How to Find Your WiFi Password on iPhone or iPad

    Apple made this shockingly easy starting with iOS 16.

    1. Go to Settings → WiFi
    2. Tap the (i) icon next to your connected network
    3. Tap Password
    4. Authenticate with Face ID or Touch ID

    Boom. Password revealed.

    This only works for networks your device has already joined, so if you’ve never connected to it, jump to the router methods below.

    How to Find Your WiFi Password on Android

    Android’s approach leans on QR codes, which honestly feels like one of the more underrated features in mobile settings.

    1. Open Settings
    2. Tap Connections (or Network & Internet)
    3. Tap your connected network
    4. Tap Share or the QR code icon

    According to Android Police, Android 10 and later versions display both the password and a scannable QR code, which makes sharing WiFi with guests almost effortless — no typing required at all.

    If your phone runs an older Android version, you might need to root the device or use a third-party app, which I wouldn’t recommend unless you really know what you’re doing.

    How to Find Your WiFi Password Through the Router Admin Panel

    Now here’s the method that works regardless of your device, your OS, or whether you’ve ever connected before.

    This one goes straight to the source: the router itself.

    Step-by-Step Guide

    1. Open a browser on any connected device
    2. Type your router IP address — usually 192.168.1.1 or 192.168.0.1
    3. Log in using your router admin username and password
    4. Navigate to Wireless, WLAN, or WiFi Settings
    5. Look for Wireless Security or Passphrase

    Here’s a tip that trips people up constantly: your router admin password and your WiFi password are two completely different things. One lets you into the router’s settings; the other lets devices connect to your network. Mixing these up is one of the most common points of confusion, according to Software Testing Help’s breakdown of default router credentials.

    If you’ve never changed your admin credentials, they’re often something as simple as “admin/admin” or “admin/password” — a security risk worth fixing once you’re in there. Forgotten or default router credentials are one of the most common reasons home users end up contacting ISP support, according to TeamViewer’s guide on WiFi password recovery, which is worth keeping in mind if you’re setting up a network for family members who might lose access down the line.

    Special Cases: Mesh Routers, ISP-Supplied Routers, and Work WiFi

    Most guides stop at traditional routers, but a lot of home networks today don’t work quite the same way.

    Mesh Systems (Eero, Google Nest WiFi, TP-Link Deco)

    Mesh routers have largely moved away from browser-based admin panels in favor of dedicated apps. Open the manufacturer’s app (Eero, Google Home, or Deco), tap your network, and the password is displayed directly in the app’s WiFi settings. There’s no IP address to type in — everything is managed through Bluetooth pairing and the app itself.

    ISP-Supplied Routers (Xfinity, Verizon, Spectrum)

    If your router came from your internet provider, skip the manual IP lookup and use their self-care app instead — MyVerizon, the Xfinity app, or your provider’s equivalent. These apps typically show your current network name and password on the main dashboard without requiring a router login at all.

    Work or Enterprise WiFi

    Office and enterprise networks usually don’t use a single shared password the way home networks do. Instead, they rely on individual login credentials tied to your employee account, managed through IT. If you’re struggling to connect on a work network, the fix isn’t finding a password — it’s contacting your IT department directly, since enterprise networks are configured differently by design.

    What If You’ve Never Changed Your Default WiFi Password?

    This one’s actually the easiest scenario of them all.

    Flip your router over.

    Most routers ship with a printed label on the bottom or back showing the default SSID (network name) and password. If you’ve never customized it, that sticker is still accurate.

    Look for fields labeled:

    • SSID / Network Name
    • WiFi Password / WPA Key / Passphrase
    • Admin Password (this is separate — don’t confuse it)

    This sticker method remains the fastest option available, since it requires zero devices, zero commands, and zero login attempts.

    What If Nothing Works?

    Sometimes, despite trying everything, you’re still stuck.

    Maybe no device has the password saved. Maybe the admin credentials were changed and forgotten too. If that’s you, there’s one last option.

    Factory Reset

    1. Locate the small reset button on your router (usually recessed)
    2. Hold it down for about 10 seconds while powered on
    3. Wait for the router to restart

    This restores the router to its factory default password, meaning you’re back to square one — but at least it’s a solvable square one.

    Just know this wipes your custom network name, password, and any other settings you configured previously. You’ll need to set everything up fresh afterward, so treat this as your last resort, not your first move.

    How to Avoid This Problem in the Future

    Let’s be honest — nobody wants to go through this twice.

    A few small habits make a massive difference here:

    • Save your WiFi password in a password manager the moment you set or change it
    • Write it down somewhere physical if you’re not using a digital manager (a sticky note near the router genuinely works)
    • Enable QR code sharing on your phone so guests never need to type anything
    • Regularly update your wireless security key to keep your network protected

    Small effort now saves you a headache later. For more on strengthening your setup, see our guide on how to change your WiFi password and how to speed up a slow WiFi connection.

    Wrapping Up

    Finding a lost WiFi password feels stressful in the moment, but as you’ve seen, there’s almost always a way back in — whether that’s through your device’s saved network settings, your router’s admin panel, the sticker on the back of the hardware, or, worst case, a factory reset.

    Pick the method that fits your situation, follow the steps above, and you’ll be back online in minutes. And once you’ve found it? Save it somewhere safe this time.

    Frequently Asked Questions

    What is my WiFi password if I never changed it?

    Check the sticker on your router. The default password is usually printed there alongside the network name.

    Can I find my WiFi password without admin access?

    Yes — if you’re already connected on a Windows, Mac, or Android 10+ device, you can view it through your device settings without needing router admin credentials.

    Is the router admin password the same as the WiFi password?

    No. The admin password logs you into the router’s settings page. The WiFi password lets devices join your network. They’re separate credentials.

    How do I share my WiFi password without saying it out loud?

    Use the built-in QR code sharing feature on Android 10+ or iOS, or Universal Clipboard between Apple devices.

    What do I do on a mesh network like Eero or Google Nest WiFi? Open the manufacturer’s app rather than a browser — the password is shown directly in the app’s network settings.

    What do I do if nothing works?
    Perform a factory reset on your router to restore the original default password, then reconfigure your network from scratch.

  • How to Print From iPhone: Step-by-Step Guide (2026)

    How to Print From iPhone: Step-by-Step Guide (2026)

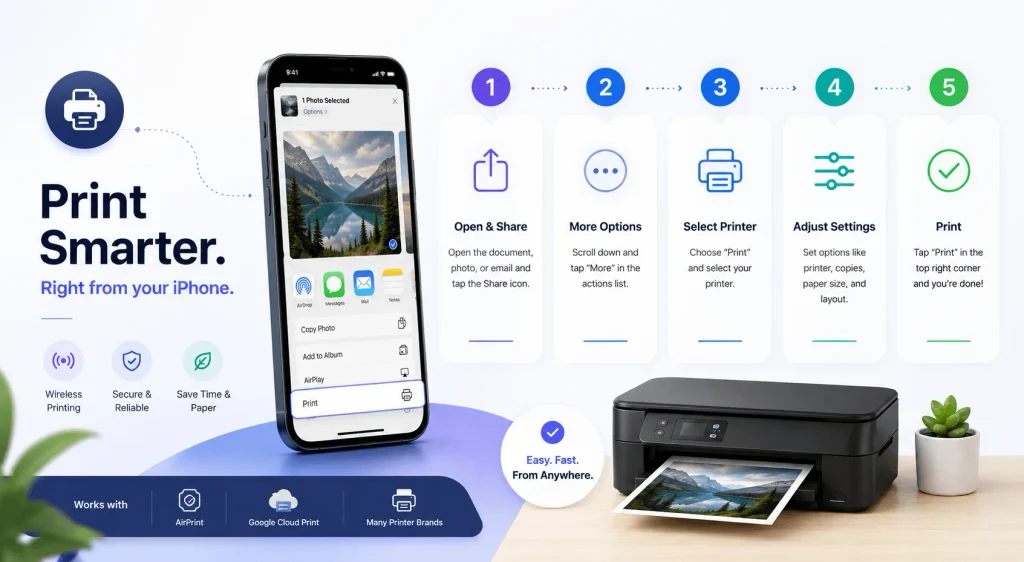
    To print from iPhone, open the app with your file, tap the Share button, scroll down and tap Print, then select an AirPrint printer from the list. This works wirelessly over Wi-Fi in under 30 seconds — no cables, no drivers, no extra apps required. If your printer doesn’t support AirPrint, you can still print using a manufacturer app, Bluetooth, or a cloud printing service, all of which I cover below.

    I’ve tested this process myself on iOS 26.6, and the whole thing — from opening Photos to hearing the printer whir to life — took me about 45 seconds. Let me walk you through every method, step by step, so you’re never stuck again.

    What Is AirPrint and Why It Matters

    Before you print anything, you need to understand the technology that makes it all work. This section explains the basics in plain English so you’re not confused later.

    Honestly, AirPrint is the backbone of iPhone printing. According to Apple’s official support documentation, it’s Apple’s built-in wireless printing protocol, and it comes pre-installed on every iPhone — no downloads, no drivers, nothing extra required.

    Here’s the deal: if your printer is AirPrint-enabled, you can send a print job in seconds. If it’s not, don’t panic — I’ll show you workarounds further down. If you’ve had connection trouble before, it’s also worth checking our guide on fixing iPhone Wi-Fi problems, since a shaky connection is often the real culprit behind failed print jobs.

    AirPrint works over Wi-Fi, and that’s important. It does not work over cellular data, and it doesn’t support wired or USB connections. So first things first — check that both your iPhone and printer are joined to the same Wi-Fi network.

    Quick gut-check: not sure if your printer supports AirPrint? Look for an “AirPrint” badge on the box, or check your printer’s settings menu. You can also confirm compatibility straight from Apple’s list of AirPrint-compatible printers. And if you’re troubleshooting a “printer not found” error, it often comes down to your network name — see our guide on what is an SSID to understand why matching network names matters so much for AirPrint.

    AirPrint vs. Other Printing Methods (Comparison Table)

    Not sure which method fits your setup? Here’s a quick side-by-side comparison before you commit to one approach.

    MethodSetup DifficultyRequires an App?Best For
    AirPrintVery easyNoMost home/office printers on the same Wi-Fi
    BluetoothEasyYes (manufacturer app)Portable/thermal printers
    Wi-Fi DirectModerateNoNewer printers without a router nearby
    USB (Lightning/USB-C)HardYes (third-party app)Older, USB-only printers
    Cloud PrintingEasyYes (ezeep, HP ePrint, etc.)Remote printing or managing multiple printers

    As you can see, AirPrint wins on convenience nearly every time — which is exactly why I’d try it first before touching any of the alternatives.

    How to Print From iPhone Using AirPrint (Step-by-Step)

    Okay, this is the part you actually came for. I’m going to break this down into dead-simple steps, because nothing is more frustrating than vague instructions.

    Follow along:

    1. Connect both devices to the same Wi-Fi network. This is non-negotiable. Go to Settings > Wi-Fi on your iPhone and confirm the network name matches your printer’s.
    2. Open the app containing whatever you want to print — Mail, Photos, Safari, Files, Pages, you name it.
    3. Tap the Share button (that little square with the arrow pointing up) or the Actions menu, depending on the app.
    4. Scroll down and tap Print. If you don’t see it right away, swipe up — sometimes it’s hiding.
    5. Tap “No Printer Selected”, then choose your AirPrint printer from the list.
    6. Adjust your print settings — number of copies, page range, single vs. duplex printing — whatever fits your job.
    7. Tap Print in the top-right corner, and you’re done.

    Seriously, that’s it. Within a few seconds your printer should spring to life. According to Apple’s support page, this process is identical across iPhone and iPad, and I confirmed it myself on iOS 26.6 — no version-specific quirks to worry about right now.

    Printing Specific Content Types

    Not every print job looks the same, though, and that trips people up. Let me break down a few common scenarios so you know exactly what to expect.

    • Printing photos: Open the Photos app, select your image, tap Share, scroll to Print, pick your paper size and quality setting (I recommend “Photo” or “High Quality” for the best results).
    • Printing emails: In Mail, open the message, tap the reply arrow at the bottom, and select Print. For attachments, tap the file first, then hit Share > Print.
    • Printing from Safari: Load the webpage, tap Share, and scroll to Print — handy for boarding passes, receipts, or articles you want in hard copy.
    • Printing PDFs and Files app documents: Open the file, tap Share, then Print, just like everywhere else.

    The pattern repeats itself app to app, which honestly makes life a lot easier once it clicks. If you’re printing from a newer device, our iPhone 16 Pro Max guide covers the Share sheet layout and other iOS specifics worth knowing.

    What to Do If AirPrint Isn’t Working

    Now here’s where things get a little annoying. Sometimes AirPrint just… doesn’t cooperate. I get it — nothing kills momentum faster than a printer that refuses to show up on the list.

    If your iPhone says “No AirPrint Printers Found,” don’t throw your printer out the window just yet. This is a genuinely common issue, and there’s almost always a fix.

    Common Causes and Fixes

    Let’s go through the usual suspects one by one.

    1. Different Wi-Fi bands. Believe it or not, this trips up more people than anything else. Many routers broadcast separate 2.4GHz and 5GHz networks. Your iPhone might be hopping onto the 5GHz band while your printer sits on 2.4GHz — technically the same router, but AirPrint treats them as separate networks. Check your printer’s network settings and make sure the network name matches your iPhone’s exactly.

    2. Airplane Mode reset. This sounds too simple to work, but it genuinely does. Flip on Airplane Mode, wait 10 seconds, then turn it back off. This forces your iPhone to fully reconnect to Wi-Fi, which — according to The Droid Guy’s 2026 troubleshooting guide — refreshes the network discovery process that finds nearby printers.

    3. Restart everything. I know, I know — the classic “turn it off and on again.” But power-cycling your printer, your router, and your iPhone resolves a surprising number of connectivity hiccups.

    4. Bonjour/mDNS issues. AirPrint relies on a discovery protocol called Bonjour (mDNS) to find printers on your local network. If this service gets interrupted — often by outdated router firmware — your printer simply won’t appear, even if everything else looks fine.

    5. Check your printer for physical issues. Sounds obvious, but low ink, paper jams, or error lights can quietly block AirPrint from connecting properly.

    6. Update everything. Outdated iOS or outdated printer firmware can absolutely break AirPrint. As of writing, Apple lists iOS 26.6 as the current release — a quick software update fixes more issues than you’d expect.

    If you’ve tried all of that and you’re still stuck, SwitchingToMac has a solid deep dive with eleven separate troubleshooting angles worth exploring.

    How to Print From iPhone Without AirPrint

    So what happens if your printer just doesn’t support AirPrint at all? This happens more often than you’d think, especially with older or budget printer models. Don’t worry — you’ve still got options.

    Option 1: Manufacturer Apps

    Most major printer brands built their own iPhone apps specifically to fill this gap. These typically add extra features too, like scanning and ink monitoring.

    • HP printers → HP Smart app
    • Canon printers → Canon PRINT Inkjet/SELPHY app
    • Epson printers → Epson iPrint
    • Brother printers → Brother iPrint&Scan

    Just download the relevant app from the App Store, connect it to your printer (usually via Wi-Fi setup within the app), and print directly from there. PrintGuides’ 2026 comparison is a solid resource if you want brand-specific screenshots.

    Option 2: Bluetooth Printing

    Some printers — especially portable and thermal printers — support Bluetooth instead of Wi-Fi. If yours does, turn on Bluetooth on both your iPhone and printer, pair them, and print through the manufacturer’s dedicated app. Keep in mind that, as iTech Guides points out, Bluetooth support doesn’t automatically make a printer AirPrint-compatible — you’ll still need the right app.

    Option 3: Wi-Fi Direct

    Wi-Fi Direct lets your iPhone connect straight to the printer’s own Wi-Fi signal, no router required. Enable it on your printer, then join that network from your iPhone’s Wi-Fi settings just like you would any other network.

    Option 4: USB Connection (With a Catch)

    Here’s something a lot of people don’t realize — iPhones don’t natively support USB printing. There’s no built-in workflow for it. If you’re determined to use a USB-only printer, you’ll need a third-party app plus a Lightning-to-USB or USB-C adapter, and honestly, it’s often more hassle than it’s worth.

    Option 5: Cloud Printing Services

    If you manage multiple printers, or you want to print remotely, a cloud printing service might be your best bet. Services like ezeep let you print to virtually any printer — Wi-Fi, USB, or otherwise — by routing the print job through the cloud instead of a direct local connection.

    Manufacturer cloud services work similarly:

    • HP ePrint
    • Epson Connect
    • Canon Cloud Printing Gateway

    Each one assigns your printer a unique email address, so you can literally email a document and have it print — from anywhere, even outside your home network. If you’re building out your Apple accessory setup at the same time, check our AirPods Pro guide for another piece of the ecosystem worth optimizing.

    How to Cancel a Print Job on iPhone

    Sent something to print by mistake? It happens to the best of us. Luckily, canceling is quick.

    Here’s how:

    1. Swipe up (or double-press the Home button on older iPhones) to open the App Switcher.
    2. Look for Print Center — it appears automatically while a job is in progress.
    3. Tap it, then select Cancel Printing.

    Done. Your job stops immediately, and you can start fresh if needed.

    Frequently Asked Questions

    Do I need extra apps to use AirPrint?

    Nope — it’s built right into iOS. No downloads required.

    Can I use AirPrint over cellular data?

    No, AirPrint strictly requires a shared Wi-Fi connection between your iPhone and printer.

    Which apps support AirPrint?

    Most native apps do — Mail, Photos, Safari, Files, Pages — plus plenty of third-party apps from the App Store.

    How do I know if my printer supports AirPrint?

    Check the printer’s manual, look for an AirPrint badge, or check Apple’s official compatible printers list.

    Can I print double-sided from my iPhone?

    Yes, as long as your printer supports duplex printing — the option will appear automatically in your print settings.

    Final Thoughts

    At the end of the day, printing from iPhone really isn’t complicated once you understand how AirPrint works and what your backup options are. Start with AirPrint — it’s fast, wireless, and requires zero setup. If that doesn’t pan out, lean on your printer manufacturer’s app, or consider a cloud printing service if you print often or remotely.

    I hope this guide saved you the headache I went through the first time I tried figuring this out myself. Bookmark it, share it with a friend who’s stuck, and you’ll never have to Google “why won’t my iPhone find my printer” again.

  • What Is an SSID? Complete Guide (+ How to Find Yours) 2026

    What Is an SSID? Complete Guide (+ How to Find Yours) 2026

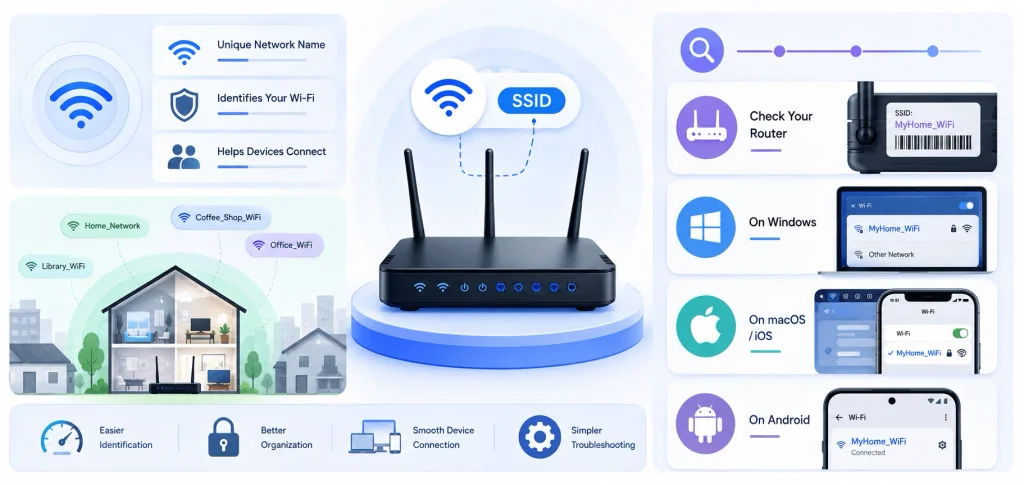
    An SSID (Service Set Identifier) is the name your wireless router broadcasts so nearby devices can find and connect to your Wi-Fi network. It’s the label you see when you open your Wi-Fi settings, things like “Netgear54” or “HomeWiFi_5G.” Every device on your network relies on this name to know which signal belongs to you.

    You’ve seen an SSID a hundred times without realizing it. But here’s the thing: it isn’t just a label. It plays a real role in how your devices connect, how secure your home network is, and how easily strangers can identify your setup. Let’s break this down properly.

    What Does SSID Actually Stand For?

    SSID stands for Service Set Identifier, and according to the IEEE 802.11 wireless standard, it’s a unique text string that identifies a specific wireless network.

    Think of the 802.11 standard as the rulebook every Wi-Fi device follows. It’s what makes sure your iPhone, your laptop, and your smart fridge can all understand each other on the same network, regardless of who made them.

    An SSID can be made up of letters, numbers, dashes, periods, and even spaces. It’s case-sensitive too, which trips a lot of people up. “HomeWiFi” and “homewifi” are treated as two completely different networks by your devices.

    There’s a hard limit here: an SSID can be a maximum of 32 characters, per the 802.11 standard as confirmed by whatismyip.com. No exceptions. So if you’re planning to rename your network to something clever, you’ve got 32 characters to work with.

    Where Does the SSID Come From?

    Your router or access point generates and broadcasts the SSID automatically the moment it powers on. It doesn’t need you to do anything.

    Most manufacturers set a default SSID before the device leaves the factory. That’s why you’ll see names like “TP-Link_4A2B” or “ASUS_Guest” out of the box. It’s just the brand name plus a random string, printed on a sticker on the bottom of the router.

    How Does an SSID Actually Work?

    An SSID gets broadcast through a beacon frame, a small signal your router sends out at regular intervals to announce its presence. According to WhatIsMyIP’s technical breakdown, this broadcast happens through beacon frames sent as defined by the IEEE 802.11 standard.

    Your phone or laptop picks up these beacon frames constantly in the background. That’s how your Wi-Fi list populates when you tap the Wi-Fi icon. Every network you see is broadcasting its SSID over and over, dozens of times per second.

    Once you tap a network, your device sends a connection request. If the network is secured, you’ll need a password, or in enterprise setups, 802.1X authentication. Once that handshake completes, you’re on.

    Visible vs. Hidden SSID

    Most routers broadcast their SSID publicly. That’s a visible SSID, and it’s why you can open your settings and pick your network from a list without typing anything.

    A hidden SSID stops announcing its name to the world. To connect, you have to manually type the exact network name yourself.

    Hiding your SSID feels like a security move, but it’s mostly cosmetic. According to NordVPN’s breakdown, hiding your SSID gives you a small privacy bump at best. Anyone using basic network scanning tools can still detect hidden networks. Don’t rely on this alone for security.

    SSID vs BSSID: What’s the Difference?

    SSID is the network name you see and interact with. BSSID (Basic Service Set Identifier) is the actual MAC address of the specific access point radio broadcasting that name.

    Picture a chain of coffee shops, all called “Bean There.” That’s your SSID: one name, shared across every location. Each individual shop has its own street address though. That’s your BSSID.

    Here’s a side-by-side breakdown:

    FeatureSSIDBSSID
    Full nameService Set IdentifierBasic Service Set Identifier
    FormatText string, up to 32 charactersMAC address (12 hex digits)
    PurposeHuman-readable network nameIdentifies one physical access point
    ScopeCan span multiple access pointsUnique to a single access point
    Example“HomeWiFi_5G”00:1A:2B:3C:4D:5E
    Who uses itEnd users connecting to Wi-FiDevices and network admins behind the scenes

    If you’ve got a mesh Wi-Fi system with three access points spread around your house, all using the SSID “MyHomeNetwork,” each of those three access points still has its own unique BSSID under the hood, per IT GOAT’s mesh network analysis. Your devices use the BSSID behind the scenes to figure out which physical access point gives the strongest signal, even though you only ever see one SSID.

    This distinction matters for anyone getting into networking, IT support, or wardriving research, where identifying the exact physical device matters more than the friendly name.

    SSIDs and Frequency Bands (2.4GHz vs 5GHz)

    Most modern routers broadcast two separate SSIDs, one for each frequency band they support. You’ll typically see something like “HomeWiFi” for the 2.4GHz band and “HomeWiFi_5G” for the 5GHz band.

    The 2.4GHz band reaches farther through walls but runs slower. The 5GHz band is faster but has a shorter range. Some newer routers merge both bands under a single SSID and let the router decide which band each device connects to, a feature usually called “band steering.”

    If you see two networks from the same router, that’s normal. Pick whichever gives you a stronger signal for the device you’re using.

    Why Your SSID Matters More Than You Think

    Your SSID isn’t just cosmetic. It affects your day-to-day Wi-Fi experience in a few concrete ways.

    • It prevents connection confusion. If two nearby networks share the same SSID, your device might latch onto the weaker signal without you realizing it, as Reolink notes in its SSID guide.
    • It’s your first line of network hygiene. A default SSID broadcasting your router’s brand and model tells anyone nearby exactly what hardware you’re running.
    • It shapes how you manage multiple networks. A guest network, an IoT network, and your main household network are much easier to keep straight with distinct names.

    How to Find Your SSID (Step-by-Step)

    Check Physical and On-Device Sources

    1. Check the router sticker. Flip your router over. Most list the default network name and password right there.
    2. Open your device’s Wi-Fi settings. On Windows, click the Wi-Fi icon in the taskbar. On Mac, click the Wi-Fi icon in the menu bar. On mobile, go to Settings > Wi-Fi.
    3. Look at your currently connected network. It’s usually labeled “Connected” above or below the name.

    Check the Router Admin Panel

    1. Log into your router’s admin panel if you’ve changed the SSID and forgotten it. Type your router’s IP address (often 192.168.1.1 or 192.168.0.1) into a browser, log in, and check the wireless settings tab.
    2. Use a network scanning app like inSSIDer or WiFi Explorer if you want to see every SSID broadcasting nearby, not just your own.

    How to Change Your SSID (And Why You Should)

    Changing your SSID is one of the easiest security upgrades available, and most people never bother.

    1. Log into your router’s admin panel using its IP address.
    2. Navigate to the Wireless or Wi-Fi Settings section.
    3. Find the field labeled “SSID” or “Network Name.”
    4. Type in your new name. Keep it under 32 characters, and avoid personal information like your last name or address.
    5. Save the settings and reconnect all your devices using the new name.

    Don’t get too clever here. Something memorable but not personally identifying works best. Skip anything that reveals your address, apartment number, or full name.

    Common SSID Mistakes to Avoid

    • Keeping the default SSID. It broadcasts your router’s brand and model, making targeted attacks easier.
    • Using personal information in the name. Your name, apartment number, or phone number has no business being part of a network name.
    • Relying only on a hidden SSID for security. As covered above, this offers minimal protection on its own.
    • Duplicating another nearby SSID. This causes connection confusion for both networks.
    • Skipping a strong password because the SSID feels “secure enough.” The SSID and the password do completely different jobs. Don’t confuse the two.

    For a deeper walkthrough on locking down your whole home network, not just the name, check out our Checksum Error guide if you’re troubleshooting broader connectivity issues, or our Dropbox connection error guide if renaming your SSID triggered sync errors on connected apps.

    Frequently Asked Questions

    Can two networks have the same SSID?

    Yes, technically two networks can share an SSID. But devices might struggle to tell them apart, sometimes connecting to the weaker or wrong one automatically.

    Does changing my SSID disconnect my devices?

    Yes, temporarily. Every device connected to the old network name needs to reconnect using the new name and password.

    Is a hidden SSID more secure?

    Only slightly. It adds minor privacy, but skilled attackers can still detect hidden networks with the right tools.

    What’s the maximum SSID length?

    32 characters, per the 802.11 standard. There’s no strict minimum.

    Should I use my real name as my SSID?

    No. Skip anything personally identifiable. Pick something memorable but generic instead.

    Why do I see two SSIDs from one router?

    Most routers broadcast separate SSIDs for the 2.4GHz and 5GHz bands. Some merge them into one name using band steering.

    Wrapping This Up

    Your SSID is a small piece of your network’s identity, but it carries more weight than most people give it credit for. It’s how your devices find your network, how you distinguish your Wi-Fi from your neighbor’s, and it’s one of the easiest things you can tweak to strengthen your home network’s security posture.

    Take five minutes today. Log into your router, check your current SSID, and change it if it’s still sitting on the factory default. Small step, but it genuinely matters.

  • What Does PMO Mean in Text? (5 Real Meanings, 2026)

    What Does PMO Mean in Text? (5 Real Meanings, 2026)

    PMO most commonly means “piss me off” in texting and social media slang, but it can also stand for “put me on,” “private message only,” or — in a professional setting — “project management office.” I’ve dug through Reddit threads, Urban Dictionary entries, and even a Texas slang study to figure out exactly when people use which meaning. By the end of this guide from SlangDecoded, you’ll never have to guess what PMO means again — whether it shows up in a text from your crush or an email from your boss.

    I’ll be honest with you: I didn’t expect this three-letter acronym to have five completely different meanings. But that’s exactly what makes it worth writing about.

    If you’re new here, check out our related guide on what the “does not equal” sign means — PMO isn’t the only symbol or acronym causing confusion this year.

    Why PMO Confuses So Many People

    Here’s the thing about internet slang — it almost never means just one thing anymore, and PMO is a textbook example of that chaos.

    A recent slang confusion study out of Texas actually named PMO as one of the most baffling abbreviations circulating among texters in 2025, right alongside “ICL.” That’s not a small thing. When researchers are studying your slang, you know it’s genuinely tripping people up.

    So why does this happen? Honestly, it comes down to a few things:

    • Multiple generations use it differently. Gen Z on TikTok means something totally different than a project manager in a Monday standup.
    • Platform context changes meaning. PMO on Snapchat isn’t the same as PMO in a corporate Slack channel.
    • It evolved from spoken slang. Phrases get compressed into acronyms fast, and the original meaning gets fuzzy.

    You really do need context clues — tone, platform, who’s texting you — before you can nail down what someone means. If you’re also curious about texting shortcuts more broadly, our guide on how to put a line through text covers another commonly searched texting formatting question.

    The 5 Real Meanings of PMO (Ranked by How Common They Are)

    Let me break this down meaning by meaning, because guessing wrong here can actually lead to some awkward misunderstandings.

    1. “Piss Me Off” — The Most Common Slang Meaning

    This is the one you’ll see the most, hands down.

    According to Dictionary.com’s slang entry, PMO functions as an internet slang acronym for “pisses me off,” and it flexes into different verb tenses depending on the sentence. So you might see:

    • “This weather PMO so bad.”
    • “Nothing PMO more than slow wifi.”
    • “I’m pmo’d right now, not gonna lie.”

    Wikipedia’s glossary of 2020s slang backs this up too, listing PMO as 2020s slang for “piss me off.” It’s basically the shorthand version of expressing frustration or annoyance without typing out the whole phrase.

    Quick tip: if the sentence has a negative or complaining tone, you’re almost certainly looking at this meaning.

    2. “Put Me On” — The Slang Request

    This one trips people up because it looks nothing like “piss me off” in meaning, but the letters are identical.

    Per PlainTextConverter’s breakdown, “put me on” is used as a request for inclusion — someone wants to be introduced to a person, a song, an opportunity, whatever. Examples:

    • “PMO with her Snap 👀” — introduce me to her.
    • “Bro, PMO with that playlist.” — share it with me.
    • “Y’all going to that party? PMO.” — let me come too.

    Here’s a cool bit of linguistic history — this phrase actually has roots in African American Vernacular English (AAVE) and hip-hop culture, where “putting someone on” meant introducing them to a lifestyle, a connection, or an opportunity. TikTok and Instagram just compressed it into three letters.

    I genuinely think this is one of the more interesting acronym origin stories out there. Slang doesn’t come from nowhere — it comes from somewhere real.

    3. “Project Management Office” — The Business Meaning

    Okay, pivot completely. This is where PMO stops being slang and starts being a legitimate business term.

    Wikipedia’s entry on project management offices defines it as a group or department within a business, government agency, or enterprise that defines and maintains standards for project management across the organization. It’s basically the department responsible for:

    • Documentation and templates
    • Governance and standards
    • Performance metrics
    • Keeping projects on time and on budget

    If you see PMO in a work email, a LinkedIn post, or a job title, this is almost certainly what’s meant. There’s zero overlap with the slang version — different world entirely.

    4. “Private Message Only”

    This one’s more niche, but it does show up, especially on group chats and public forums.

    Per PMO Meaning’s dictionary page, in text messages, PMO can signal that a conversation should move to private messaging. There’s also a variant, “PMO SM,” which specifically means “private message only on social media” — used when someone wants to take a public conversation into DMs.

    You’ll usually catch this meaning in comment sections, forums, or group chats, not one-on-one texts.

    5. The NoFap / Self-Discipline Meaning

    I want to mention this one briefly because it does exist and people do search for it, but I’m keeping this section short and factual on purpose.

    In certain online self-improvement communities, PMO is used as shorthand connected to discussions around habit-tracking and self-discipline — often tied to the “NoFap” movement, as noted by AmazingTalker’s language Q&A. If you come across this usage, it’s almost always in a specific forum context, not in everyday texting between friends.

    What Does PMO Mean on Reddit?

    On Reddit, PMO carries an extra layer of context you won’t see as much on TikTok or Snapchat.

    In subreddits related to slang or texting, it typically follows the same “piss me off” or “put me on” meanings covered above. But in self-improvement and habit-tracking subreddits, PMO is far more likely to refer to the NoFap-related meaning, since those communities use the acronym as shorthand in daily check-in posts and streak trackers.

    So the rule of thumb: check which subreddit you’re in before assuming the meaning. A slang subreddit and a self-improvement subreddit will use the same three letters completely differently.

    How to Tell Which Meaning Someone’s Using: A Step-by-Step Guide

    I know that’s a lot of meanings for three letters. So here’s a quick system I use to figure out context fast.

    Step 1: Check the platform. TikTok, Snapchat, and Instagram comments? Lean slang (“piss me off” or “put me on”). LinkedIn, email, or a work Slack? Lean business (project management office).

    Step 2: Read the tone of the sentence. Is it complaining or frustrated? That’s “piss me off.” Is it requesting something or asking to be included? That’s “put me on.”

    Step 3: Look at who’s texting you. A coworker or manager almost never means slang. A friend, especially a younger one, almost never means the corporate term.

    Step 4: Check for emoji or punctuation cues. Something like “PMO 😩” leans frustration. “PMO?? 👀” leans “put me on” — it reads more like a request.

    Step 5: When in doubt, just ask. Seriously, there’s no shame in texting back “wait what do you mean by PMO 😅” — texting has zero tone of voice, and misreading it can genuinely cause confusion.

    PMO Meaning Comparison Table

    MeaningCommon PlatformToneExample
    Piss me offTikTok, texting, IGFrustrated/annoyed“This traffic PMO”
    Put me onSnapchat, IG, textingRequesting/curious“PMO with that song”
    Project management officeEmail, LinkedIn, workProfessional/neutral“She works in the PMO”
    Private message onlyGroup chats, forumsNeutral/directive“PMO for details”
    NoFap/self-disciplineNiche forums, RedditInformalDaily check-in posts

    Why Knowing PMO’s Meaning Matters for Clear Communication

    Look, texting already strips out tone of voice, facial expressions, and body language — that’s just the nature of digital communication. Add a five-meaning acronym into the mix, and it’s honestly a small miracle we understand each other at all.

    That’s really why context is everything here. The same three letters can express annoyance, make a request, describe a corporate department, or signal a private conversation — and the only way to know which one is happening is to slow down for half a second and read the room (or the group chat).

    If you’re someone who texts across generations — parents texting teens, managers messaging Gen Z employees — this kind of generational slang gap is only going to keep showing up. PMO is just one example of a much bigger pattern in how internet slang evolves. Since PMO shows up so often in TikTok comments and captions, you might also want to check out our guide on TikTok profile pictures if you’re building out your TikTok presence.

    Frequently Asked Questions About PMO

    What does PMO mean in a text from a girl?

    It depends entirely on context, but most commonly it means “piss me off” (expressing frustration) or “put me on” (asking to be included or introduced to something). Check the tone of the surrounding message for the clearest clue.

    What does PMO mean on Snapchat?

    On Snapchat, PMO usually means “put me on,” as in asking to be introduced to someone or something, like “PMO with her Snap.” It can occasionally mean “pisses me off” depending on tone.

    What does PMO mean on Reddit?

    On Reddit, PMO usually follows standard slang meanings in general subreddits, but in self-improvement and habit-tracking communities, it typically refers to the NoFap-related meaning instead.

    Is PMO the same as IMO?

    No. IMO means “in my opinion,” while PMO has multiple unrelated meanings including “piss me off” and “put me on.” They’re easy to confuse visually but mean completely different things.

    What does PMO mean in business?

    In a professional setting, PMO stands for “project management office” — a department responsible for setting project management standards, documentation, and metrics across an organization.

    What does PMO mean on TikTok?

    On TikTok, PMO is almost always slang, most often meaning “piss me off,” though “put me on” also appears frequently in comment sections and captions.

    Why is PMO considered confusing slang?

    Because it has at least five distinct meanings depending on platform, tone, and audience — a factor confirmed by a Texas-based slang study that named it among the most confusing modern text abbreviations.

    Does PMO always mean something negative?

    No. Only the “piss me off” meaning carries a negative or frustrated tone. “Put me on” is a neutral-to-positive request, and the business meaning is entirely neutral.

    What’s the origin of “put me on”? The phrase has roots in African American Vernacular English and hip-hop culture, where it originally meant introducing someone to a lifestyle, opportunity, or connection — later shortened to PMO through social media.

    PMO Meaning: Key Takeaways

    At the end of the day, PMO is a perfect example of how three letters can carry five completely different meanings depending on where you see them and who’s typing them. Whether it’s slang for frustration, a request to be included, a private messaging cue, or a legitimate business department, context really is the deciding factor every single time.

    Next time PMO shows up in your texts, run through the quick checklist — platform, tone, sender, and cues — and you’ll land on the right meaning almost instantly. And if a new acronym trips you up next, SlangDecoded has you covered.

  • What Is a Checksum Error? Causes & Fixes (2026 Guide)

    What Is a Checksum Error? Causes & Fixes (2026 Guide)

    What is a checksum error? It’s your computer telling you that a file, a setting, or a packet of data doesn’t match the fingerprint it’s supposed to match. That’s it. That’s the whole thing. I’ve hit this checksum mismatch message on BIOS screens at 2 a.m., inside half-downloaded ISO files, and in ZFS storage pools carrying data I really didn’t want to lose. So let me walk you through what it means, why it happens, and exactly what to do — no jargon walls, I promise.

    Here’s the part most articles skip.

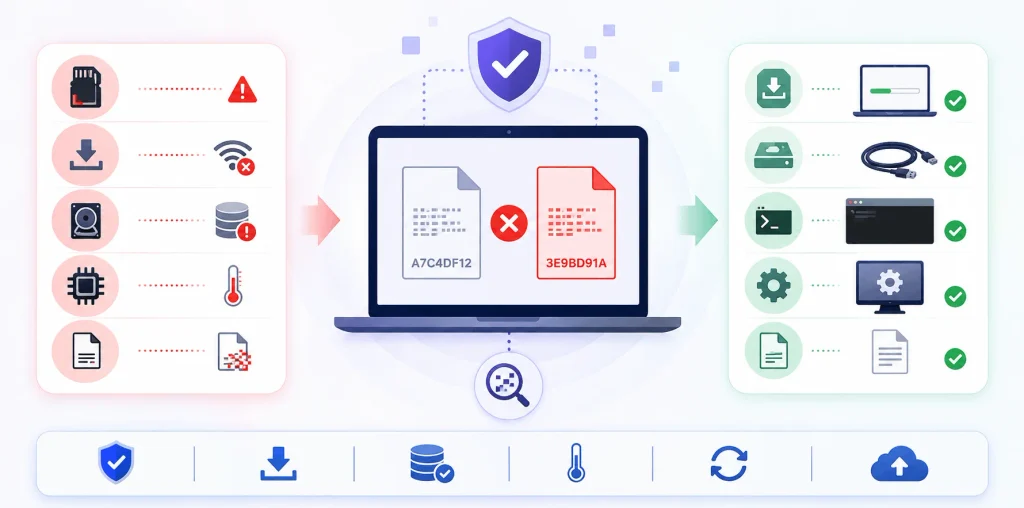
    A checksum error is not one problem. It’s four completely different problems that happen to share a name. And if you don’t know which one you’re staring at, you’ll waste an afternoon replacing a battery when your real issue was a flaky Wi-Fi connection.

    What Is a Checksum Error, Exactly?

    Before we chase fixes, you need the mental model. A checksum is a small value calculated from a chunk of data — think of it as a receipt. You save the receipt. Later, you recalculate it. If the two receipts match, the data almost certainly didn’t change. If they don’t match, something happened in between, and your system throws a checksum error to warn you. Simple idea, enormous consequences.

    Now here’s what I love about this concept.

    A checksum is a small-sized datum derived from a block of digital data for the purpose of detecting errors — and the integrity of the data gets verified by recomputing that value and comparing it against the stored one.

    Think of it like a tamper-evident seal on a bottle of medicine.

    The seal doesn’t tell you what went wrong inside. It just tells you the bottle isn’t sealed anymore. Your job is to figure out why.

    Detection Versus Correction (This Trips Everyone Up)

    I want to kill a myth right now, because it causes real damage. People assume a checksum fixes data. It doesn’t. It flags data. Most error detection methods — parity bits, modular sums, cyclic redundancy checks — are detection-only tools. Correction requires redundancy stored somewhere else. Knowing that difference changes how you respond to a failure, and it changes what you back up.

    Here’s the honest limitation.

    According to the Wireshark documentation, using a checksum drastically reduces the number of undetected transmission errors — but the usual algorithms cannot guarantee 100% detection, so a very small number of errors slip through.

    GeeksforGeeks shows this beautifully with a worked example: when bit errors in two data segments cancel each other out, the total sum stays identical and the corruption goes completely unnoticed.

    Rare? Yes. Impossible? Nope.

    Checksum Error Quick Diagnosis Table

    Start here. Read the message on your screen, find the matching row, and you’ll know within seconds which of the four layers you’re dealing with. I built this table after years of watching people replace perfectly good hardware because they misread the error. Match your symptom first — the fix almost always follows automatically once you’ve identified the layer correctly.

    Error message you seeLayerMost likely causeFirst fix to try
    “CMOS checksum error – defaults loaded”Firmware / BIOSDead CR2032 battery or interrupted BIOS updateLoad optimized defaults, then replace the battery
    “CRC failed in [file]. The file is corrupt”ArchiveIncomplete or interrupted downloadRe-download from the official source
    “Checksum error in the encrypted file”ArchiveWrong password, or real corruptionRe-enter the password before assuming corruption
    “Unexpected end of archive”ArchiveTruncated transferRe-download; then try Repair archive
    Hash doesn’t match publisher’s valueFile integrityTruncated download or updated fileRe-verify with SHA-256, re-download once
    CKSUM count rising in zpool statusStorageBit rot, failing disk, or bad cableRun a scrub, check SMART data
    Dropped packets, repeated retransmitsNetworkFailing NIC, bad cable, buggy proxySwap the cable, test another port

    Bookmark that. It saves more time than anything else in this article.

    The Four Places You’ll Meet a Checksum Error

    This is the section I wish existed when I started troubleshooting. The message looks similar everywhere, but the root cause lives in totally different hardware. I’ve grouped them by layer — firmware, archives and downloads, networking, and storage — so you can identify yours in about ten seconds. Read the four descriptions below, find the one that matches your screen, and skip straight to that fix.

    Let’s go one by one.

    1. CMOS Checksum Error – Defaults Loaded (The Boot Screen One)

    You power on. You get a black screen that says “CMOS checksum error – defaults loaded. Press F1 to continue, DEL to enter setup.” Your stomach drops. Relax — this is usually the cheapest fix on the entire list. Your motherboard stores BIOS settings in a tiny memory chip, calculates a checksum over them, and re-verifies it at every single boot.

    When those numbers disagree, you get the warning.

    Some BIOS versions warn and continue with existing settings. Others assume corruption and load safe default values from the BIOS chip instead.

    The most common culprit? A dying coin cell.

    As The Windows Club explains, the CMOS checksum can go bad after a power failure or a reset during BIOS boot, and a damaged or dead RTC battery produces the same message.

    Secondary triggers to rule out: an interrupted BIOS update, a recently added stick of RAM, or malware that mangled firmware settings.

    2. CRC Failed / Checksum Error in the Encrypted File (The Archive One)

    You download a 4 GB archive, wait patiently, then WinRAR slaps you with “CRC failed in [filename]. The file is corrupt.” Annoying, but informative. Cyclic Redundancy Check values get stored inside the archive when it’s created, and they’re only verified at extraction time — which is why a broken file can sit on your drive looking perfectly healthy for months.

    That delay is the sneaky part.

    Cyclic redundancy checks confirm a RAR file’s integrity, and the check only fires when you actually extract.

    One weird gotcha worth knowing: WinRAR also displays a CRC error when you repeatedly enter the wrong password for an encrypted archive. So before you assume file corruption, double-check your password.

    3. TCP, UDP, and IP Checksum Failures (The Invisible One)

    Here’s the good news — you’ll almost never see this one, and that’s by design. Every packet crossing the internet carries a checksum in its header. If integrity verification fails at the receiving end, the packet gets silently dropped and retransmitted. Your video keeps playing. Your download keeps going. The network stack absorbs the data corruption before it ever reaches your screen.

    The math is genuinely elegant.

    RFC 1071, the IETF document that defines the internet checksum for IP, UDP, and TCP, describes it like this: adjacent octets are paired into 16-bit integers, the 1’s complement sum is formed, and the 1’s complement of that sum goes into the checksum field. To verify, the receiver recomputes the sum over the same octets including the checksum field — and if the result is all 1 bits, the check passes.

    You only notice packet corruption when it’s relentless — think failing NIC, bad cable, or a badly behaved proxy.

    4. Storage Checksum Errors and Silent Data Corruption (The Scary One)

    Now the one that actually keeps me up at night. Modern filesystems like ZFS and Btrfs checksum every block they write and verify it on every read. When they report a checksum error, they’re catching something your hard drive’s own error correction missed entirely. That’s called silent data corruption, or bit rot, and it’s far more common than the average person assumes.

    The official ZFS documentation defines the CKSUM counter plainly: the device returned corrupted data in response to a read request. In a redundant pool, ZFS pulls good data from a replica and heals the damaged copy automatically.

    And when it can’t?

    Klara Systems puts it well: ZFS follows a strict rule — if it lacks the redundancy to rebuild correct data, it reports an error instead of handing you corrupted bytes.

    The scale here is not theoretical, and the numbers are worth memorising:

    • CERN, 2007: a six-month study wrote roughly 97 petabytes across 3,000 nodes and found 128 MB permanently corrupted — with 500 errors detected across 100 nodes.
    • NetApp, 2008: a 41-month study across 1.53 million disk drives documented over 400,000 checksum mismatch instances — and about 30,000 of those were missed by the RAID controller entirely, surfacing only during disk scrubbing.
    • Nearline drives corrupted at roughly 10× the rate of enterprise drives in that same study.

    That last bullet is why cheap bulk storage and important data are a bad marriage.

    How to Fix a Checksum Error: My Step-by-Step Process

    Right, enough theory. Below is the exact sequence I run through, ordered from cheapest to most involved. Work top to bottom and stop the moment your problem disappears. Most people resolve this within the first three steps, and I’d guess 60% of readers are done after step two. Don’t skip ahead — the early steps are fast and they eliminate the noisy false positives that make everything else confusing.

    Grab a coffee. Let’s fix this.

    1. Identify which layer you’re on. Read your error message word for word. Does it mention CMOS, BIOS, or defaults? That’s firmware. Does it name a .rar, .zip, or .iso file? That’s archive corruption. Does it appear in zpool status or a NAS dashboard? That’s storage. Match first, then act.
    2. Re-download or re-copy the file. For downloads and archives, this fixes it shockingly often. An incomplete download or a dropped connection leaves you with truncated data that still opens, still looks normal, and still fails verification. Pull a fresh copy from the official source rather than a third-party mirror. Seriously — do this before anything clever.
    3. Verify the checksum yourself. Don’t guess. Measure. Every major OS ships with a built-in hash verification tool, and Akamai’s documentation lists the standard commands:
      • Windows (CMD): certutil -hashfile C:\path\to\file.iso SHA256Windows (PowerShell): Get-FileHash C:\path\to\file.iso -Algorithm SHA256Linux: sha256sum /path/to/file.isomacOS: shasum -a 256 /path/to/file.iso
      Compare the result to the publisher’s posted value. Case doesn’t matter — hex A-F equals a-f.
    4. Interpret a mismatch correctly. A checksum mismatch has a predictable ranking of causes. One well-structured guide orders them like this: a truncated download first, then bytes rewritten in transit, then a publisher who updated the file but forgot to update the posted hash, and only then genuine tampering. Check the boring explanations before you assume you’ve been attacked.
    5. Attempt archive repair — carefully. If re-downloading isn’t possible, try WinRAR’s Repair archive tool, or extract with “Keep broken files” enabled to salvage partial media. But manage your expectations: WinRAR’s own support page states that a recovery record won’t help in every scenario, and the only way to know is to run the repair and test the result.
    6. Handle the hardware cases. These split cleanly in two — see below.

    Fixing Firmware-Level Checksum Errors

    Enter setup with Del, F2, or F10, then load optimized defaults, save, and reboot. If the clock keeps resetting after that, replace the CR2032 battery — HP’s support community confirms this is the standard remedy. Reflash firmware only if it’s genuinely damaged, because a failed flash is far worse than the error you started with.

    Fixing Storage-Level Checksum Errors

    Run a disk scrub on your pool, then check SMART attributes for reallocated sectors and pending bad sectors. Swap the SATA or SAS cable before you condemn the drive — cables cause more phantom CKSUM counts than people expect. And if you’re running a serious array, confirm your RAM is ECC.

    CRC32 vs MD5 vs SHA-256: Which Checksum Should You Use?

    Quick but important. Not every checksum does the same job, and picking wrong gives you false confidence. Some algorithms exist purely to catch accidental corruption fast. Others exist to catch a deliberate attacker. Confusing the two is how people end up “verifying” a malicious download and feeling great about it. Here’s the honest breakdown.

    AlgorithmOutput lengthSpeedCollision resistanceBest used for
    CRC3232-bitFastestNone (not cryptographic)ZIP archives, network packets, storage blocks
    MD5128-bitVery fastBroken — practical collisionsAccidental corruption checks only
    SHA-1160-bitFastBroken — SHAttered, 2017Legacy compatibility only
    SHA-256256-bitModerateStrongDownloads, signatures, tamper detection
    SHA-512512-bitFast on 64-bit CPUsStrongLarge files on modern hardware

    My rule of thumb, in one line each:

    CRC32 answers “did this break?” SHA-256 answers “did someone change this?” MD5 answers neither reliably anymore.

    Practical collision attacks killed MD5’s security value, and SHA-1 fell to the SHAttered attack demonstrated by Google and CWI Amsterdam in 2017. Both remain fine for spotting accidental damage — just never for security.

    Why SHA-256 Became the 2026 Default

    Here’s the shift I’ve watched happen over the last couple of years. Checksum validation stopped being a manual, occasional habit and became automatic infrastructure. Package managers like pip, npm, and conda now verify SHA-256 hashes on every single install. Container registries verify image digests on every pull. CI/CD pipelines fail the build outright on a mismatch.

    That’s a big deal.

    It means most checksum errors you encounter in 2026 aren’t things you chose to check — they’re guardrails firing on your behalf, usually in a build log. Treat them as signal, not noise.

    Is a Checksum Error Dangerous?

    Short answer: usually no, occasionally yes. A one-off CRC failed message on a downloaded file is almost always a bad transfer. A repeated CMOS checksum error is a dying battery. But a checksum mismatch on a file you never touched, sitting on a healthy-looking drive, deserves your full attention — that’s the signature of silent data corruption or a failing disk.

    Pattern matters more than any single event.

    One error, one time? Re-download and move on.

    Same error, same file, every week? Something physical is failing, and your backups just became the most important thing you own.

    Frequently Asked Questions About Checksum Errors

    Is a checksum error the same as a CRC error?

    Effectively, yes. CRC stands for Cyclic Redundancy Check, which is one specific type of checksum. When WinRAR reports “CRC failed”, the integrity check failed because the data no longer matches what was originally stored. The same fixes apply to both error types.

    Can I recover a file that has a checksum error?

    Sometimes. Enabling “Keep broken files” during extraction salvages whatever data is readable, and media files like video or images often still play afterwards. But a checksum error means bytes are genuinely wrong — full recovery is never guaranteed. Re-downloading from the source is always cleaner than repairing.

    Why does a freshly downloaded file fail its checksum?

    Usually because the download quietly didn’t finish. Some browsers fail silently on partial downloads, leaving you with a truncated file. Other causes: you hashed the wrong file, or the publisher updated the release without updating the posted hash on a cached page.

    Does a CMOS checksum error mean my motherboard is dying?

    Rarely. In most cases it’s a CR2032 battery that’s run flat, and the giveaway is a clock that resets every time you power down. Motherboard failure is much less likely — and if the system never reaches the firmware screen at all, the checksum message is a symptom rather than the root cause.

    Should I still use MD5 to verify downloads?

    Only for spotting accidental corruption. MD5 has practical collision attacks against it, so it cannot prove a file wasn’t deliberately swapped. If a publisher offers both, always take the SHA-256 value.

    How often should I scrub a ZFS pool?

    Monthly is a common baseline for consumer setups, weekly for production arrays. A handful of repaired blocks across a large pool is normal — occasional bit rot is expected. A rising repair count across consecutive scrubs is your warning sign.

    Related Reading

    If you want to go deeper on the surrounding topics, these guides pick up where this one stops:

    More troubleshooting guides in Tech Insights

    How to Fix Dropbox Error Code 8737-IDJ-029-22

    How to Fix Slow Boot on Mac: 9 Proven Fixes

    Best Cloud Storage Services Compared (11 Tested)

  • Google Pixel 10 Pro in 2026: Still Worth It at $749?

    Google Pixel 10 Pro in 2026: Still Worth It at $749?

    The Google Pixel 10 Pro is a 6.3-inch Android flagship built around Google’s Tensor G5 chip, a 50MP triple camera with 100x Pro Res Zoom, and seven years of software updates. It launched at $999 in August 2025 and now sells for around $749. Its successor starts at $1,099 with less base RAM. That combination is the entire story of this phone in 2026, and it is why I am writing about a last-generation device instead of the shiny new one.

    Here is my honest position after a year of reviews, lab tests, and price tracking.

    Most people shopping for a flagship Android phone right now should not buy the newest thing.

    They should buy this one. Let me show you why.

    Why the Google Pixel 10 Pro Matters More in 2026 Than It Did at Launch

    Timing rewrote this phone’s value proposition. At $999, the Google Pixel 10 Pro fought the Samsung Galaxy S25 and the iPhone on level pricing, and reviewers were lukewarm. At $749, it competes against upper mid-rangers while carrying genuine flagship silicon. That is not a small shift. It is a different phone in the buyer’s mind, which means most Pixel 10 Pro review coverage from launch week is now actively misleading if you read it as purchase advice today.

    Look at what the discounted price actually buys.

    < cite index=”14-1″>The custom Tensor G5, 16GB of RAM, seven years of software support, Qi2 magnetic wireless charging, a triple camera system with Gorilla Glass Victus 2, and a free year of Google AI Pro.</cite> Droid-Life said it cleanly: $749 is a fundamentally different conversation than $999.

    The discounting has been relentless, too. < cite index=”8-1″>By June 2026 the phone sat at $250 off, or $749 for the 128GB model, with the same discount on 256GB and 512GB versions.</cite> Android Central tracked Amazon pushing $300 off as retailers cleared stock.

    Price Timeline at a Glance

    Model / TimingStoragePriceWhat Changed
    Pixel 10 Pro, Aug 2025 launch128GB$999Original MSRP
    Pixel 10 Pro, mid-2026128GB$749Steady $250 discount
    Pixel 10 Pro, July 2026 peak deal128GB~$699$300 off pre-Pixel 11
    Pixel 11 Pro, Aug 2026 launch256GB$1,099128GB tier removed entirely

    < cite index=”28-1″>Confirmed pricing from the August 12 event: $899 for the Pixel 11, $1,099 for the Pixel 11 Pro, $1,299 for the Pixel 11 Pro XL, and $1,899 for the Pixel 11 Pro Fold, with the whole lineup shipping August 20.</cite>

    So the real question is not whether this phone deserved a grand. It is whether the Google Pixel 10 Pro price today beats a successor asking $350 more than the street price of the outgoing model.

    I think it does, comfortably. Here is the evidence.

    Google Pixel 10 Pro Specs vs the Rest of the Lineup

    The hardware sheet is flagship-grade with no asterisks. < cite index=”24-1″>You get a 6.3-inch LTPO OLED at 120Hz with 3,300 nits peak brightness, the 3nm Tensor G5, 16GB of RAM, a triple camera of 50MP main, 48MP periscope telephoto and 48MP ultrawide, storage to 1TB, a 4,870mAh battery, IP68, 8K video, Wi-Fi 7 and Bluetooth 6.0.</cite> Nothing there is a mid-range part sneaking into a premium chassis. Below is how the three siblings actually compare, because the differences are narrower than Google’s marketing suggests.

    FeaturePixel 10Pixel 10 ProPixel 10 Pro XL
    Display6.3″ OLED6.3″ LTPO OLED6.8″ LTPO OLED
    RAM12GB16GB16GB
    Main camera48MP50MP50MP
    Telephoto5x optical48MP periscope48MP periscope
    100x Pro Res Zoom
    Battery4,970mAh4,870mAh5,200mAh
    Wired charging29W29W39W
    Qi2 magnetic charging
    128GB option

    Two details deserve separate billing.

    < cite index=”6-1″>The selfie camera is 42MP, and charging runs 29W wired plus 15W Qi2 wireless.</cite> Charging speed is the one spec where rivals genuinely embarrass Google, and I will not pretend otherwise. < cite index=”42-1″>GSMArena measured the smaller Pro hitting close to its promised 55% in 30 minutes, while the XL, rated for 45W, reached 64% against a claimed 70%.</cite>

    Build quality is where the money went. < cite index=”2-1″>The frame is aluminium with Gorilla Glass Victus 2 front and back, in Moonstone, Jade, Porcelain and Obsidian.</cite> Jade is the one strangers comment on.

    The Display Is the Underrated Part

    Screen quality gets buried in spec sheets, but it is the thing your hands touch for six hours a day. The Super Actua display here is an LTPO panel, so the refresh rate drops when content is static and ramps to 120Hz when you scroll. That matters more for endurance than for smoothness.

    Lab testing tempers the brightness marketing, though. < cite index=”40-1″>GSMArena recorded 2,351 nits with adaptive brightness on a 75% lit area, essentially matching the Pixel 9 Pro,</cite> so the 3,300-nit figure applies to small highlight areas rather than the whole panel.

    Outdoors in summer sun, it is still excellent.

    Compact Flagship Is a Real Category Again

    The 6.3-inch footprint deserves attention because so few premium Android phones offer it anymore. Droid-Life’s read matches mine: < cite index=”8-1″>the smaller Pro suits most people, especially anyone scrolling all day who still wants a hand free.</cite>

    If you have been pushed into a 6.8-inch slab because that is where good cameras live, this solves a problem you may have stopped complaining about.

    Pixel 10 Pro Battery Life: What Testing Actually Shows

    Expect four to five hours of screen-on time in normal use, with the smaller Pro outperforming the larger XL. That inversion surprised everyone. Android Authority’s team testing found < cite index=”39-1″>the XL struggled to pass four hours of screen-on time while the standard Pixel 10 and Pixel 10 Pro managed closer to five, or a little more with lighter use.</cite>

    Real-world reviewer data lines up. Droid-Life reported that < cite index=”38-1″>on the smaller Pixel 10 Pro, a typical 7AM to 11PM day produced three to four hours of screen time with 30% remaining.</cite>

    Against direct rivals it holds up better than the modest capacity suggests. < cite index=”44-1″>In a controlled 200-nit test alternating video recording, social apps, YouTube and gaming, the Pixel 10 Pro lasted 7 hours and 1 minute, beating the iPhone 16 Pro at 6 hours 15 minutes and the Galaxy S25 five minutes behind that.</cite>

    One caveat worth knowing. < cite index=”40-1″>GSMArena believes Google used conventional graphite anodes rather than silicon-carbon,</cite> which is why capacity stayed modest while competitors grew.

    Tensor G5: The Chip Story Nobody Explained Well

    Google switched foundries with this generation, and that is the most consequential change under the hood. < cite index=”19-1″>The Tensor G5 is Google’s first TSMC-fabricated Tensor, replacing designs derived from Samsung’s Exynos foundry.</cite> Counterpoint Research framed it as the moment Tensor became Google’s own silicon rather than a modified off-the-shelf part.

    The performance claims are specific. < cite index=”20-1″>Google says the G5 is 34 percent faster than the G4 on CPU with a TPU 60 percent faster at AI tasks, letting the newest Gemini Nano run entirely on-device without connectivity.</cite> Engadget confirmed that offline generative AI genuinely works here.

    If you want the wider context on how on-device models differ from cloud-based ones, our guide to generative AI breaks down the architecture in plain language.

    Now the part I want you to hear.

    Raw benchmarks are not this chip’s strength. MobileSyrup was blunt: < cite index=”21-1″>everyday speed across AI features and app launches was fine, but benchmarking results were disappointing.</cite>

    That trade was deliberate. Google optimized for on-device AI throughput and sustained efficiency over peak scores.

    Pro Res Zoom and the 100x Question

    The telephoto system is the single strongest reason to pick the Pro over the base model. < cite index=”23-1″>The updated architecture delivers 10x optical quality and 20x super-resolution zoom, then reaches 100x professional resolution zoom with AI assistance, a workload so heavy that only the Pro has the processing bandwidth for it.</cite>

    Results are startling. They also raise a question few reviews answer honestly.

    PhoneArena asked it directly: < cite index=”2-1″>the AI sharpens the existing image and creates pixels from scratch with zero information from the sensor and the reality it is supposed to capture, which invites the question of when a photo stops being a photo.</cite>

    My rule: use 100x to read a street sign, not to document anything you need to be true.

    Camera Coach splits people. Business Standard found that < cite index=”18-1″>composition advice is useful but limited to static frames, and in fast scenes or with moving subjects it often causes missed moments.</cite> The same review landed a point that stuck with me: < cite index=”18-1″>imaging progress was minimal because the Pixel 10 Pro reuses the sensors introduced with the Pixel 9 Pro.</cite>

    So the computational photography improved. The hardware collecting the light did not.

    Magic Cue: Brilliant or Broken, Depending Who You Ask

    Reviews genuinely contradict each other on this feature, so I will give you both sides instead of picking the convenient one.

    The optimistic case, from Engadget: < cite index=”20-1″>with permission, Gemini reads your screenshots, calendar and Gmail, then surfaces the venue email address your friend needs or nudges your calendar when someone asks about weekend plans, marked with a rainbow aura that has become visual shorthand for AI.</cite>

    The pessimistic case is harsher. BigGo’s testing found that < cite index=”24-1″>in organic use the assistant rarely surfaced anything meaningful, and when asked for an event address stored in Google Calendar it returned the wrong neighbourhood instead of the actual venue.</cite>

    Both are true. Magic Cue shines when your Google account is dense with structured data and you live in Gmail and Calendar. It does close to nothing if you do not.

    Worth noting for upgraders: < cite index=”31-1″>Google’s newer lineup pushes toward agentic tasks like ordering groceries or booking rides, which 9to5Google describes as a large jump from Magic Cue, though Magic Cue itself is not going away.</cite>

    Should You Buy the Google Pixel 10 Pro or the Pixel 11 Pro?

    Buy the older one in most cases, and the RAM situation is the reason people are missing. < cite index=”31-1″>The Pixel 11 Pro moves to Tensor G6 with 50% more TPU power, paired with 12GB of RAM as the baseline across the series, up to 16GB but down from last year at the bottom tier.</cite>

    Read that again.

    The discounted Google Pixel 10 Pro ships with 16GB standard. The newer Pro starts at 12GB and costs $350 more at street prices. For a phone sold on on-device AI, memory is not a footnote.

    Here is my step-by-step decision process.

    Step 1: Check your current phone’s battery health. Above 80% capacity on a Pixel 9 Pro? Skip this generation. The sensor carryover means your camera is nearly identical.

    Step 2: Pick your size. Want compact? The standard Pro is your only premium option. Want maximum screen? < cite index=”6-1″>The XL brings 6.8 inches, 5,200mAh and 39W wired charging,</cite> though its endurance tested worse.

    Step 3: Set a price alert at $749 or below. Track Android Central’s deals coverage monthly. Never pay list price for a phone in its final retail quarter.

    Step 4: Choose storage deliberately. < cite index=”28-1″>The 128GB tier is gone from the current generation entirely.</cite> If you shoot 8K or keep offline libraries, 256GB is your floor.

    Step 5: Confirm the support window. Seven years from August 2025 means updates into 2032, longer than most people keep a phone. If you’re cross-shopping platforms, compare it against Apple’s flagship in our iPhone 16 Pro Max guide before you commit.

    Who Should Skip This Phone

    • Fast-charging obsessives. 29W wired is genuinely behind the market.
    • Competitive mobile gamers. Benchmark performance trails Snapdragon flagships.
    • Anyone outside Google’s ecosystem. Half the value is switched off by default.
    • Heavy screen-time users. Four to five hours of screen-on time is adequate, not class-leading.
    • Buyers who need years-out battery health. Android Authority raised concerns about degradation across a seven-year support window.

    Everyone else should look hard at the discount. If you’re weighing whether to wait for a newer release instead, our iPhone 17 launch guide covers the same wait-or-buy calculation from the Apple side, and the AirPods Pro guide is worth a look if you’re building out audio to match.

    Frequently Asked Questions

    Is the Google Pixel 10 Pro still worth buying in 2026?

    Yes, especially discounted. You get current-generation silicon, a full flagship camera, 16GB of RAM, and software support through 2032 for less than many mid-rangers cost new.

    How much should I pay for a Google Pixel 10 Pro right now?

    Target $749 or below for 128GB. < cite index=”8-1″>That price recurred throughout 2026,</cite> so paying more usually means you moved too fast.

    How long does the Pixel 10 Pro battery last?

    Roughly four to five hours of screen-on time daily. < cite index=”44-1″>In controlled testing it ran 7 hours 1 minute, ahead of the iPhone 16 Pro and Galaxy S25.</cite>

    Does the Pixel 10 Pro support Qi2 magnetic accessories?

    Yes. Qi2 magnetic wireless charging at 15W works with Pixelsnap cases, wallets, power banks and car mounts without an adapter.

    How long will the Pixel 10 Pro receive updates?

    Seven years from its August 2025 launch, so security and OS updates run into 2032.

    Does Pro Res Zoom actually work at 100x?

    It produces legible, usable images, but it generates detail the sensor never captured. Treat it as convenience, not documentation.

    What is the difference between the Pixel 10 and Pixel 10 Pro?

    RAM and cameras. < cite index=”5-1″>The base model has 12GB against the Pro’s 16GB,</cite> and only the Pro handles 100x zoom.

    Is Magic Cue worth enabling?

    Only if you use Gmail and Calendar heavily. Its usefulness scales with how much of your life already lives inside Google.

    I would rather own a discounted flagship with more RAM and seven years of updates than a new phone at full price offering incremental gains. If that logic tracks for you, set your alert and move before remaining stock disappears.

    Final Verdict: Is the Google Pixel 10 Pro the Smart Buy in 2026?

    The Google Pixel 10 Pro is the best-value flagship Android phone available right now, and the math is not close. At roughly $749, you get 16GB of RAM, a full triple-camera system with 100x zoom, Qi2 magnetic charging, and software updates running through 2032. Its successor asks $1,099 and starts with less memory.

    That gap will not last. Retailers are clearing the remaining stock, and once it goes, the value case goes with it.

    So set a price alert, decide between the compact Pro and the larger XL, and buy before the inventory dries up. If you want the newer option side by side, our Pixel 11 Pro breakdown covers what your extra $350 actually buys.

  • How to Crop in Preview on Mac: Full 2026 Guide

    How to Crop in Preview on Mac: Full 2026 Guide

    To crop in Preview on Mac, open your image or PDF, click Show Markup Toolbar, select the Rectangular Selection tool, drag over the area you want to keep, then click Crop (or press Command-K). It works the same way for both photos and PDFs, and Preview lets you undo the crop anytime before you save.

    I’ll be honest with you — for years, I didn’t even realize my Mac had a built-in tool that could handle basic photo editing and PDF editing without me needing to download anything extra. Then I discovered Preview, and it changed how I handle quick image and document edits forever.

    If you’ve ever needed to crop an image on Mac or trim down a PDF before sending it off, you’re in the right place. This guide is updated for macOS 2026, and I’m going to walk you through exactly how I crop in Preview, step by step, with zero fluff. Let’s get into it.

    What Is Preview, Anyway?

    Before we jump into the how-to, let me quickly explain what we’re working with here. You might already have this app open right now without realizing its full power.

    Preview is Apple’s native Mac Preview app — it comes pre-installed on every Mac, and while most people think of it as just a photo viewer, it’s actually a surprisingly capable editing tool. You can resize photos, rotate them, and — the star of this show — crop images and PDFs with just a few clicks.

    And here’s the best part: you don’t need Photoshop, you don’t need a subscription, and you don’t need to learn some complicated new interface. It’s already sitting on your dock. If you’re curious about lightweight alternatives too, I’ve also put together a guide on free AI photo editor tools and apps worth checking out.

    How to Crop an Image in Preview (Step-by-Step)

    Okay, let’s get to the good stuff. This is the part you actually came here for, so I’m not going to waste your time.

    Here’s exactly what I do every single time I need to crop a photo:

    1. Open your image in the Preview app.
    2. Click Show Markup Toolbar (if it’s not already visible).
    3. Select the Rectangular Selection tool — this is your crop tool.
    4. Click and drag to draw a box around the part of the image you want to keep.
    5. Once you’re happy with your selection, hit the Crop button in the toolbar.

    That’s it. Genuinely, that’s the whole process. You first select the area you want to keep, and then Preview discards the rest — and if you want to view the exact dimensions of your selection, you can choose Tools > Show Inspector and pick a unit of measurement in the Crop Inspector window.

    Made a Mistake? Here’s How to Undo It

    Don’t panic if you crop the wrong section — I’ve done this more times than I’d like to admit. To undo the crop immediately, just choose Edit > Undo Crop. And if you realize later that you need the original back, you can go to File > Revert To > Browse All Versions and restore the version from before you cropped it.

    This is honestly one of my favorite things about Preview — it’s forgiving. You’re not going to permanently destroy your original file by accident.

    Cropping to a Specific Size or Aspect Ratio

    Here’s a question I get a lot: can you crop to an exact pixel size in Preview? Yes, sort of.

    After making your rectangular selection, open Tools > Show Inspector, then click the Crop Inspector icon. From there, you can view and adjust the dimensions in inches, pixels, centimeters, or points before you commit to the crop. It’s not a true “type in exact dimensions and auto-crop” feature like some paid tools offer, but it does let you fine-tune your selection with real numbers, which is great for prepping images for social media dimensions or a specific aspect ratio.

    How to Crop a PDF in Preview

    Now, cropping images is great, but what about PDF cropping? Good news — the process works almost identically.

    Here’s how I do it:

    1. Open your PDF file in Preview.
    2. Show the Markup Toolbar.
    3. Select the Rectangular Selection tool.
    4. Drag to select the portion of the page you want to keep.
    5. Click Crop (or press Command-K).

    Just like with images, you’re selecting the area you want to keep and discarding the rest — and you can undo the crop immediately through Edit > Undo Crop, or later through File > Revert To > Browse All Versions.

    Important: Preview Cropping Isn’t Always Permanent

    Here’s something I wish someone had told me earlier. According to Smallpdf, Preview uses non-destructive cropping — meaning the content outside your selected area is hidden, but it’s not actually deleted from the file.

    So if you’re sending a sensitive document and you’re cropping out private information, don’t assume it’s gone forever. It might still technically be embedded in the file.

    Speed Things Up With Keyboard Shortcuts

    If you’re like me and you crop images fairly often, memorizing a few shortcuts will save you a ton of time. Trust me on this one.

    According to a detailed breakdown from ladedu.com, you can use the arrow keys to nudge your selection by one pixel, or hold Shift with an arrow key to move it by 10 pixels at a time. You can also zoom in and out with Command + and Command -, and when you’re ready, just press Command K to crop instantly.

    There’s also a neat trick if you want to “cut” instead of crop: use Command Shift I to invert your selection, then crop from there. I use this one when I want to remove a specific object from a photo rather than keep just one section.

    What If the Crop Button Is Greyed Out?

    This one trips up a lot of people, and honestly, it tripped me up the first time too. If this happens alongside other odd Mac behavior, it’s also worth ruling out bigger performance issues — I cover common culprits in my Mac slow boot fixes guide.

    If your Crop option won’t click, it’s usually because Preview doesn’t detect an active selection yet. Per UPDF’s troubleshooting guide, if the Crop menu item is greyed out, you need to first make a selection using the Rectangular Selection tool — and if that tool isn’t visible, you can go to Edit > Select All, then drag the selection over the area you want to keep before heading to Tools > Crop.

    Simple fix, but easy to miss if you’re moving fast.

    The Screenshot Workaround (For Permanent Crops)

    If you want a crop that’s truly locked in — no hidden data, no chance of reverting — there’s a clever workaround using your Mac’s built-in screenshot tool.

    Here’s the method, based on guidance from itselectable: open your PDF in Preview, go to File > Take Screenshot, choose Selection, Window, or Entire Screen, and once you’ve got your cropped screenshot saved as a PNG, go to File > Export as PDF to convert it back.

    This method flattens your document completely, which is perfect for situations where privacy or file cleanliness really matters.

    Preview vs. Other Cropping Tools

    You might be wondering how Preview stacks up against the paid or web-based alternatives out there. Here’s the honest breakdown:

    ToolCostEase of UseBest For
    Preview (Mac)Free (built-in)Very easyQuick, everyday crops on images and PDFs
    Adobe Acrobat ProPaid subscriptionModerateAdvanced PDF editing, batch cropping, precise crop marks
    SmallpdfFree tier + paid plansEasyBulk cropping, cloud-based workflows
    SejdaFree (limited) + paidEasyQuick online crops without installing software

    My take: if you just need to crop a photo or trim a PDF page here and there, Preview is genuinely all you need — it’s free, it’s already on your Mac, and it does the job in under a minute. If you’re regularly batch-processing dozens of PDFs or need pixel-perfect crop marks for print, that’s when I’d reach for Acrobat or a dedicated web tool like Smallpdf.

    Bonus: Resizing and Batch Editing

    While we’re here, it’s worth mentioning that Preview isn’t just for cropping. You can also handle image resizing and even edit multiple photos at once.

    To resize several images at the same time, display them together in the same window, select them all in the sidebar, then choose Tools > Adjust Size. This is a massive time-saver if you’re prepping a batch of photos for a website or presentation.

    Frequently Asked Questions

    Can I crop a PDF in Preview?

    Yes. Open the PDF, show the Markup Toolbar, select the Rectangular Selection tool, drag over the area you want to keep, then click Crop or press Command-K.

    Does cropping in Preview delete the original image?

    No — Preview’s cropping is non-destructive by default. You can undo it via Edit > Undo Crop, or recover an earlier version through File > Revert To > Browse All Versions.

    Why is the Crop button greyed out in Preview?

    This usually means you haven’t made an active selection yet. Use the Rectangular Selection tool to draw a box first, then Crop should become clickable.

    Can I crop to an exact pixel size in Preview?

    You can view and adjust your selection’s dimensions using the Crop Inspector (Tools > Show Inspector), but Preview doesn’t offer a type-in-exact-dimensions auto-crop feature.

    Is Preview cropping permanent?

    Not necessarily. Preview hides the cropped-out content rather than deleting it outright. For a fully flattened, permanent crop, use the screenshot-and-export method described above.

    Can I crop multiple images at once in Preview?

    Not directly — cropping is a one-image-at-a-time action. However, you can resize multiple images simultaneously via Tools > Adjust Size.

    Final Thoughts

    So there you have it — everything you need to crop in Preview like a pro, whether you’re working with images or PDFs.

    Here’s my honest take: for quick, everyday edits, Preview genuinely holds its own against paid tools. You don’t need Photoshop. You don’t need Adobe Acrobat. You already have everything you need sitting right there in your Applications folder.

    Give it a shot next time you need a quick crop — I think you’ll be surprised at how capable this “simple” app really is.

  • How to Put a Line Through Text: Full Guide

    How to Put a Line Through Text: Full Guide

    If you want to put a line through text, select it and use the strikethrough shortcut for your app — usually Ctrl/Cmd + Shift + X in Google apps, Ctrl + 5 in Excel, or the ~~text~~ syntax in Markdown. Below, I’ll walk you through every method, app by app, plus how to remove it and fix it when it doesn’t work.

    I’ll be honest with you — strikethrough is one of those tiny formatting tricks nobody teaches you, but once you know it, you’ll use it constantly. Maybe you’re crossing off a finished to-do. Maybe you’re showing a discounted price. Or maybe you just want your document to look a little more human.

    Whatever the reason, I’ve tested every method across every major app, so you don’t have to. Let’s get into it.

    What Does “Strikethrough” Actually Mean?

    Before you go clicking buttons, it helps to know what you’re actually doing — and why it matters more than you’d think.

    Strikethrough — also called a line through text, crossed-out text, or struck-through text — is a horizontal line drawn across a word or sentence. It doesn’t delete anything. The text is still there, still selectable, still searchable. You’re just visually marking it as outdated, canceled, or no longer relevant.

    Think of it like a pen crossing off an item on a paper list. The item’s still written down — you just know it’s done.

    According to MDN Web Docs, this distinction matters even more in code, because there’s a real difference between text that’s simply outdated and text that was formally deleted — which affects accessibility and how screen readers announce it.

    If you’re also curious about other text symbols people search for, I broke down the does not equal sign meaning and its history in a separate guide — worth a read if formatting quirks like this interest you.

    Strikethrough Shortcuts at a Glance

    Here’s the fast version — bookmark this table if you don’t want to read the whole guide.

    AppWindowsMacNotes
    WordAlt, H, 4Cmd + Shift + XNo dedicated single shortcut by default
    Google DocsAlt + Shift + 5Cmd + Shift + XSame shortcut in Sheets and Slides
    ExcelCtrl + 5Ctrl + 5Doesn’t work in Excel Online
    PowerPointAlt, H, 4Cmd + T → check boxNo direct Mac shortcut
    GmailAlt + Shift + 5Cmd + Shift + XSame as Google Docs
    Markdown~~text~~~~text~~Requires GFM support

    Now let’s go deeper into each one.

    How to Strikethrough Text in Microsoft Word

    Word’s a workhorse, but it hides this feature a little.

    Step-by-step method

    1. Select the text you want to cross out.
    2. Head to the Home tab.
    3. Click the strikethrough icon (it looks like “abc” with a line through it).

    Keyboard shortcut method

    On Windows, press Alt, H, then 4 — one after another, not all at once. On Mac, it’s Cmd + Shift + X.

    Here’s a fun fact I didn’t expect: Word doesn’t give strikethrough its own dedicated shortcut the way it does for bold and italics, according to Smartupworld’s shortcut breakdown. Weird, right? You can fix that yourself by assigning a custom keyboard shortcut through File → Options → Customize Ribbon.

    How to remove strikethrough in Word

    Select the struck-through text and press Ctrl + Spacebar — this clears strikethrough along with any other manual formatting, resetting the text to default.

    How to Strikethrough Text in Google Docs

    If you live in Google Docs, you’re in luck — this one’s fast.

    Desktop method

    • Highlight your text.
    • Press Alt + Shift + 5 (Windows) or Cmd + Shift + X (Mac).

    That’s it. Two seconds, done.

    Mobile method

    Tap the “A” formatting icon, then select Strikethrough. Works the same on Android and iOS.

    One thing worth mentioning: if you’re collaborating using Suggesting mode, Google Docs automatically displays deleted text with a strikethrough so your teammates can see exactly what’s being proposed. Pretty slick.

    To remove it, just select the text and reapply the same shortcut — toggling it twice removes it.

    How to Strikethrough Text in Excel

    Excel handles this differently than Word, but it’s arguably the easiest app on this whole list.

    Select your cell (or the specific text inside it), then hit Ctrl + 5. Same shortcut on Windows and Mac — no need to memorize two versions.

    Prefer the dialog-box route? Press Ctrl + 1 to open Format Cells, click over to the Font tab, and check the Strikethrough box.

    Quick heads-up: per Smartupworld’s testing, Excel Online doesn’t support the Ctrl+5 shortcut at all — you’ll need to go through the Format Cells menu manually there.

    How to Strikethrough Text in HTML and CSS

    Now it gets a little more technical — but stick with me, because getting this right actually matters for SEO and accessibility.

    You’ve got three options, per W3docs:

    1. The <del> tag

    Use this when content was literally deleted or removed — revision histories, price changes, edited documents.

    html

    <del>$120</del> Now only $85!

    2. The <s> tag

    Use this when something is no longer accurate or relevant, but you still want it visible for context, as MDN explains.

    html

    <s>Support for Internet Explorer 11 continues.</s>

    3. CSS text-decoration: line-through

    Use this when the line is purely visual and carries no semantic meaning.

    css

    .struck { text-decoration: line-through; }

    Avoid the old <strike> tag — it’s officially obsolete in HTML5, and using it can trigger validation errors and hurt accessibility, since screen readers won’t announce it as meaningfully as <del>.

    How to Strikethrough Text in Markdown

    If you write in Markdown — for a blog, README file, or note-taking app — this one’s refreshingly simple.

    Wrap your text in double tildes:

    ~~this text is struck through~~

    That renders as this text is struck through.

    Here’s a gotcha that trips people up constantly: per Guidest’s Markdown guide, this syntax is part of GitHub Flavored Markdown (GFM), not the original CommonMark spec. Older or stricter Markdown parsers won’t render it.

    If that happens, swap in the <del> tag instead — a reliable fallback that works almost everywhere. And if you’re working with AI writing tools that sometimes mangle formatting like this, my guide to humanizing AI text covers a few tools worth checking out.

    Strikethrough in Notion, Slack, and Other Apps

    You’ll find the same basic pattern almost everywhere:

    • Notion: Select text, press Cmd/Ctrl + Shift + S, or use ~~text~~ inline.
    • Slack: Wrap your message in single tildes: ~text~.
    • Gmail: Highlight text, press Alt + Shift + 5 (Windows) or Cmd + Shift + X (Mac).
    • PowerPoint: On Windows, Alt, H, 4. On Mac, there’s no direct shortcut — press Cmd + T to open the Font dialog and check the box manually.

    Troubleshooting: When Strikethrough Won’t Work

    If your shortcut isn’t doing anything, run through this checklist:

    1. Make sure text is actually selected — most shortcuts do nothing on an empty cursor.
    2. Check for shortcut conflicts — antivirus tools, screen readers, or browser extensions sometimes hijack combinations like Ctrl+Shift+X.
    3. Try the menu-based method instead — Format Cells in Excel, or the Font dialog in Word (Ctrl + D).
    4. Restart the app — a stuck formatting toolbar is a surprisingly common, boring cause of shortcuts failing silently.

    FAQ: Quick Answers About Strikethrough

    How do I put a line through text in Word?

    Select the text and press Alt, H, 4 (Windows) or Cmd + Shift + X (Mac), or click the strikethrough button on the Home tab.

    What’s the fastest way to strikethrough in Google Docs?

    Highlight the text and press Alt + Shift + 5 (Windows) or Cmd + Shift + X (Mac).

    Does strikethrough delete the text?

    No. It’s formatting only — the text stays visible, searchable, and copyable unless you separately delete it.

    Which HTML tag should I use for strikethrough?

    Use <del> for removed content, <s> for outdated-but-relevant content, and CSS text-decoration: line-through for purely visual styling. Avoid the obsolete <strike> tag.

    Why doesn’t my strikethrough shortcut work?

    Usually a text-selection issue or a conflicting shortcut from another app. Try the menu-based method as a fallback.

    Wrapping Up: Which Method Should You Use?

    At the end of the day, strikethrough is a small feature that says a lot when used right. If you’re working in Word, Docs, or Excel, the keyboard shortcut is always your fastest bet. If you’re coding, pick your HTML tag based on meaning, not just looks — that’s what actually helps your accessibility and SEO.

    So next time you need to put a line through text, you won’t have to Google it again — you’ll already know exactly which method fits what you’re doing.

  • Does Not Equal Sign (≠): Meaning, History & Uses

    Does Not Equal Sign (≠): Meaning, History & Uses

    The does not equal sign (≠) means two values, numbers, or expressions are different. It’s the direct opposite of the equals sign (=), and you’ll see it everywhere from basic math class to programming code, where it’s typically written as != or <> since most keyboards don’t have a dedicated ≠ key.

    That’s the short version. Now let’s go deep.

    Because once you understand the not equal to symbol — its history, its Unicode code, how to type it, and how it works across programming languages — you’ll never have to google “how to type ≠” again.

    Let’s dive in.

    What Is the Does Not Equal Sign, Really?

    Quick gut-check before we go further: the ≠ symbol simply means two things are not the same.

    That’s the whole concept.

    Visually, it’s the standard equals sign (=) with a diagonal slash through it — a clean, universal way of saying “these values are distinct.” You’ll bump into it in math class, in logic puzzles, and (if you’re a developer like me) constantly in your code editor.

    Here’s a simple example:

    • 5 ≠ 3 → “five is not equal to three”
    • x ≠ y → “x does not equal y”

    A (Surprisingly Cool) History of the Equals Sign

    I’ll admit — I did not expect to find myself geeking out over 16th-century math notation. But here we are.

    Before symbols existed, mathematicians just… wrote it out in words. People used terms like aequales, gleich, or faciunt to express equality, because there was no shared symbol for it yet. Imagine writing an entire equation using full sentences. Exhausting.

    Then, in 1557, everything changed.

    A Welsh mathematician named Robert Recorde invented the equals sign (=) in his book The Whetstone of Witte, reportedly because he was tired of repeating the phrase “is equal to” over and over. (Honestly? Relatable.)

    And get this — one of the earliest known equality notations actually dates back to Diophantus’s Arithmetica around AD 250, where he used a shortened form of the Greek word for “equals.”

    So the concept is ancient. The symbol itself is a Renaissance invention. The “not equal” version came along much later to formalize an idea people had been expressing informally for centuries.

    The Not Equal Symbol in the Unicode World

    Here’s where it gets a little technical, but stick with me — this part is genuinely useful.

    The not equal to symbol has an official home in the Unicode standard, which acts as the universal library of every character your computer can display.

    • Unicode code point: U+2260
    • Official name: NOT EQUAL TO
    • Category: Sits in the “Relations” subblock of the Mathematical Operators block
    • Approved: As part of Unicode version 1.1, back in 1993

    Screen readers even have their own shorthand for it. Accessibility tools like CLDR label it simply as “not equal,” with search tags like equal, inequality, inequation, and not.

    How to Type the Does Not Equal Sign (Step-by-Step)

    This is the part everyone actually searches for. So let’s make it dead simple.

    On Windows

    1. Make sure Num Lock is on.
    2. Hold Alt.
    3. Type 8800 on your numeric keypad.
    4. Release Alt — boom, ≠ appears.

    If you’re working in Microsoft Word specifically, there’s an even faster trick: type 2260, then hit Alt + X, and Word will auto-convert it into the ≠ symbol for you.

    On Mac

    Just press Option + = and the ≠ symbol appears instantly. Works across Pages, Keynote, Notes — basically everywhere.

    On the Web (HTML)

    Use &ne; or &#8800; in your HTML, and both will render the ≠ symbol correctly in any browser.

    In LaTeX

    Use the \neq command, or alternatively \not= to achieve the same result.

    Quick Reference: Shortcuts by Platform

    Platform / AppShortcut
    Windows (general)Alt + 8800
    Microsoft Word2260, then Alt + X
    Mac (any app)Option + =
    HTML≠ or ≠
    LaTeX\neq or \not=
    Excel / Google SheetsSee formula section below

    The “Not Equal” Operator in Programming

    Since most keyboards don’t have a dedicated ≠ key, programming languages needed an ASCII-friendly workaround. That’s where the not equal operator comes in.

    Python

    In Python, != is the standard not equal operator, used in both Python 2 and Python 3. There used to be an alternative, <>, but it’s deprecated in modern Python — so stick with !=.

    python

    x = 10
    y = 20
    print(x != y)  # Output: True

    JavaScript

    The loose inequality operator (!=) checks whether two values are different, regardless of their data type. The strict inequality operator (!==), on the other hand, does not attempt type coercion — it returns false only when values (and types) match exactly.

    javascript

    console.log(10 != '10');   // false (loose comparison)
    console.log(10 !== '10');  // true (strict comparison)

    Pro tip: always default to !== in JavaScript unless you have a specific reason not to. It saves you from confusing bugs down the road.

    SQL, Pascal, and BASIC

    Languages like Pascal, SQL, and BASIC often use the <> notation instead of !=, since it more closely mirrors traditional mathematical inequality.

    Haskell

    Haskell breaks from the != convention entirely and uses /= for “not equal,” which visually echoes the mathematical ≠ symbol much more closely than the C-style != does.

    Excel, Google Sheets, and R (the gap most guides skip)

    If you work in spreadsheets or data analysis, you’ll hit “not equal” constantly — and the syntax is different from what you’d expect:

    • Excel & Google Sheets: Use <> — for example, =IF(A1<>B1, "Different", "Same")
    • R: Use != — for example, x != y
    • SQL (most dialects): Both <> and != typically work, though <> is the ANSI SQL standard

    If you’re building spreadsheet-heavy workflows and want an AI to generate these formulas for you automatically, it’s worth browsing AI-powered Excel formula tools — several listed there can turn a plain-English request straight into a working <> comparison formula, so you don’t have to remember the syntax at all. One good example is Formulaizer, an AI Excel formula generator that handles exactly this kind of comparison logic.

    Full Comparison Table

    Language / ToolNot Equal Operator
    Python!=
    JavaScript (loose)!=
    JavaScript (strict)!==
    SQL (ANSI standard)<>
    Pascal / BASIC<>
    Excel / Google Sheets<>
    R!=
    Haskell/=
    C / C++ / Java!=

    Related Symbols You Should Know

    While we’re here, it’s worth quickly covering the ≠ symbol’s close cousins:

    • — almost equal to
    • — identical to (used heavily in logic and modular arithmetic)
    • — less than or equal to, defined in Unicode at code point U+2264 since ASCII never included a native character for it

    Frequently Asked Questions

    What does ≠ mean in math?

    It means two values are not equal — the opposite of =. For example, 5 ≠ 3 means five is not equal to three.

    Is != the same as ≠?

    Yes. != is the ASCII-keyboard-friendly version of ≠, used across most programming languages and some spreadsheet tools.

    How do I type ≠ on a Mac?

    Press Option + = and the symbol appears instantly in any app.

    How do I type ≠ on Windows?

    Hold Alt and type 8800 on your numeric keypad. In Microsoft Word, type 2260 and press Alt + X instead.

    What’s the HTML code for ≠?

    Use either &ne; or &#8800; — both render correctly in every modern browser.

    Does Excel use != or <> for “not equal”?

    Excel and Google Sheets use <>, not !=. For example: =IF(A1<>B1, "Different", "Same").

    When was the not equal symbol officially standardized?

    It was approved as part of Unicode version 1.1 in 1993, though the equals sign it’s based on dates back to 1557.

    Wrapping This Up

    So there you have it — the full story behind a symbol most of us use without a second thought.

    From a 16th-century math book to a Unicode code point to a programming operator you type dozens of times a day, the does not equal sign carries way more history than its tiny footprint suggests.

    If you take one thing away from this: next time you type != or <> in your code, you’re channeling something that traces back over 400 years.

    Got questions about a specific language’s inequality operator? Drop them in the comments — happy to dig in further.

    Read Also: How to Put a Line Through Text: Full Guide

  • PushWiki.com Traffic 2026: The Truth Nobody Checks

    PushWiki.com Traffic 2026: The Truth Nobody Checks

    No major analytics tool — not SimilarWeb, not Semrush, not Ahrefs — currently shows verifiable traffic data for PushWiki.com. What does exist is a wave of near-identical “guide” articles about the site, published within weeks of each other, that read like content marketing rather than reporting. Below, I’ll show you exactly how to check this yourself, and what the real signals say.

    I’ll be straight with you.

    You searched “PushWiki.com traffic 2026” because you saw the name pop up somewhere — maybe a backlink, maybe a random mention — and you want a real answer.

    Here’s the problem.

    Most of what’s published about PushWiki.com right now is fluff. Recycled fluff. The kind of content that sounds confident but says nothing.

    So instead of adding to that pile, I’m going to show you exactly how to check PushWiki’s traffic yourself — using the same tools professional SEOs use — and what the signals actually tell us so far.

    Let’s dig in.

    What Is PushWiki.com, Actually?

    Before you can judge a site’s traffic, you need to know what it is. And that’s harder than it sounds here.

    Here’s the weird part: articles about PushWiki.com can’t agree on what it even does. Some call it a knowledge base platform for SEO and blogging. Others say it’s a tech and AI content hub. A few frame it as a Wikipedia-style content aggregator.

    That inconsistency itself is a signal. If you want the fuller breakdown of what categories and content types PushWiki actually publishes, check out our PushWiki.com category breakdown for 2026.

    When multiple “guide” articles about the same site contradict each other — while using near-identical phrasing — that usually means they were written to rank for the keyword, not to inform you. It’s a pattern common to content farm websites, and it’s worth recognizing before you trust anything else you read about the platform.

    So step one, always: verify a site’s identity from the site itself, not from third-party recaps.

    How to Actually Check a Website’s Traffic (Step-by-Step)

    You don’t need to take anyone’s word for a site’s size. You can check it yourself in about five minutes. Here’s how I’d do it.

    Step 1: Run It Through SimilarWeb

    Head to SimilarWeb and drop the domain in.

    You’ll get an estimate of monthly visits, average session duration, bounce rate, and traffic sources — organic, direct, referral, social, and paid.

    If a domain doesn’t show up in SimilarWeb’s index at all, or the estimate is “insufficient data,” that tells you something too: the site likely doesn’t have meaningful, trackable traffic yet.

    Step 2: Cross-Check with Semrush or Ahrefs

    Next, plug the domain into Semrush’s Traffic Analytics or Ahrefs’ Site Explorer.

    Look specifically at:

    • Organic search traffic (visits from Google, not ads)
    • Referring domains (who links to it, and how authoritative they are)
    • Domain Rating / Authority Score — a proxy for overall trust and backlink strength

    A brand-new or low-authority domain will usually show thin numbers here, even if it feels like it’s everywhere online.

    Step 3: Check Google Trends

    Go to Google Trends and search the brand name.

    This won’t show you visits, but it will show you search interest over time — whether curiosity is rising, flat, or fading. Spikes often line up with a wave of near-duplicate “review” articles hitting the web, not with organic user growth.

    Step 4: Look at the Backlink Pattern, Not Just the Count

    This is the step most people skip.

    Open the referring domains list in Ahrefs or Semrush and actually read a few of them.

    Are they real, established publications? Or are they a cluster of low-authority blogs that all published a “PushWiki.com Guide 2026” within weeks of each other?

    If it’s the latter, you’re looking at a backlink profile built through content syndication or PR blasts — not organic authority. That distinction matters enormously if you’re deciding whether to trust, link to, or build on top of a site.

    Which Tool Should You Actually Use?

    Each tool tells you something different. Here’s the quick comparison:

    ToolWhat It MeasuresFree or PaidBest For
    SimilarWebEstimated visits, engagement, traffic sourcesFree (limited) / Paid tiersQuick traffic snapshot
    SemrushOrganic traffic, keywords, backlinks, authority scoreFree trial / PaidFull SEO + traffic audit
    AhrefsBacklinks, referring domains, Domain RatingFree (limited) / PaidBacklink quality checks
    Google TrendsSearch interest over timeFreeSpotting hype spikes vs. real growth

    If you only run one check, run SimilarWeb first — it’s the fastest way to see if a site has any measurable footprint at all.

    Reading the Real Signals So Far

    Based on what’s publicly checkable right now, here’s the honest picture:

    • No major SEO tool currently shows a stable, indexed traffic estimate for PushWiki.com.
    • The wave of “guide” and “review” articles about it are overwhelmingly duplicate-style content, not independent reporting.
    • The one point of actual nuance I found — from a more careful writeup — flagged that different sources describe PushWiki.com’s purpose in conflicting ways, using strikingly similar language to each other. That’s the fingerprint of a coordinated content push, not organic discovery.

    None of that means PushWiki.com is fake, or bad, or a scam. It might genuinely be a small, growing informational site. For a deeper look at whether the platform itself holds up, see our full is PushWiki.com legit? 2026 review.

    But it does mean you shouldn’t trust a specific “X million visits” number you see floating around — because as of now, none of the credible tools back it up.

    Key Terms, Quickly Explained

    • Domain Authority / Rating — a 1–100 score estimating how likely a site is to rank in search, based on backlink strength.
    • Referring Domains — the number of unique websites linking to a site (more meaningful than raw backlink count).
    • Bounce Rate — the percentage of visitors who leave after viewing just one page.
    • Content Farm — a site or network that mass-produces low-effort, keyword-targeted articles rather than original reporting.
    • Organic Traffic — visits coming from unpaid search results, as opposed to ads or social.

    Frequently Asked Questions

    Does PushWiki.com have real traffic?

    There’s no independently verifiable data confirming this either way. Major tools like SimilarWeb and Semrush don’t show a stable traffic estimate for the domain as of 2026.

    Is PushWiki.com legit?

    It may be a genuine informational site, but the surrounding “reviews” of it are largely duplicate content, so treat any specific claims about it with caution until you verify them yourself.

    How do I check any website’s traffic myself?

    Run the domain through SimilarWeb for a quick snapshot, then cross-check with Semrush or Ahrefs for organic traffic and backlink quality, and use Google Trends to see if interest is rising or just spiking.

    Why do so many “guide” articles about PushWiki.com sound the same?

    That’s typically a sign of a coordinated content push — often paid placements or syndicated posts — rather than independent journalism or genuine user demand.

    What’s the fastest way to spot a content farm?

    Compare a few articles on the same obscure topic side-by-side. If the phrasing, structure, and claims are nearly identical, you’re likely looking at templated content, not original research.

    The Bottom Line

    PushWiki.com’s real traffic size is not currently verifiable through any major analytics tool — and that gap, not a growth story, is the real headline for 2026.

    That’s not a reason to panic. It’s a reason to verify before you trust, every single time you’re evaluating a site you don’t already know.

    And that habit — checking SimilarWeb, checking backlinks, checking whether sources agree — will serve you a lot better than any single “how big is it” article ever could.